
 A debris hut is a structure constructed of found materials that can include leaf matter, branches, grasses and even snow. The insulated walls shield a person from cold and weather, serving as a combination sleeping bag and shelter. Using natural resources, a debris hut can be assembled in nearly any location. These can be used as an emergency shelter or a temporary shelter while you work to secure a more permanent structure.
While advanced skills are not required, experience and a good work ethic can be invaluable. A good training exercise is to construct a model from small sticks to get a good idea of what will be required for a full scale shelter. Another good idea is to build a full sized model using a time limit. In a survival situation, you may be limited by how much daylight is left in your day. Having a time limit will help you prioritize and work efficiently. Spending the night in your creation will quickly tell you which elements were lacking such as location, size, insulation, waterproofing, door construction, or bedding.
 When deciding where to locate your debris hut, it is best to select an area that is a safe distance away from water sources. These could flood or dampen your shelter. Check the wind direction and position the entrance away from the prevailing wind. An open area that receives optimum sunlight surrounded by a stand of trees acting as a wind break is ideal. Keep the entrance small to help retain heat. A small fire at the entrance of your shelter will help keep you dry and warm.
When constructing a debris hut, smaller is better. This saves on construction time, materials needed and the smaller space is easier for you to warm with only body heat. Make it large enough for you to wiggle into feet first. To size the structure, lie on the ground and mark the outline of your body.
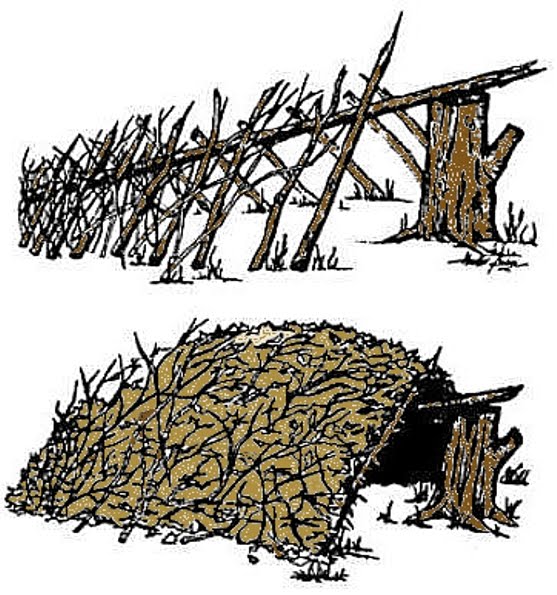
It is good to gather more material than you think you will need as the walls should be as thick as your arm’s length. Straight tree branches with leaves removed can be pounded into the ground to form your basic frame. A common method is to construct an A-frame for the entrance. This can be lashed together to form a support for the ridge pole and additional branches can be propped against the ridge pole to form the ribbing of the frame. On top of this, the debris is piled and woven to insulate and waterproof the shelter. If you have some thick plastic sheeting, use it to help waterproof your hut.
Every survival circumstance has unpredictable variables. Within these variables the human body needs to be protected from a loss of warmth that can lead to death. Knowing how to make a debris hut can truly be a lifesaver. Make a game of it and see what sort of structure you are able to construct from the things you find in your own backyard. Take the time to visit a wilderness area near your home and practice working as a group to build a structure. Once you’ve slept in your creation, you will know if there are things that need to be reworked. These fun activities can give you invaluable experience in the event of an emergency.
Dave Canterbury demonstrates how to construct a type of debris hut called a spider shelter in this short video.
The Wendell family demonstrates how a woman was able to construct her own debris shelter and overnight comfortably with her children in the structure.


That was a great post Kay! My boys love building things like that at the back of our property. They have never slept in them though.
ReplyDeleteKerri