Kay's Picks

    ↓ WHY I USE iHerb ↓


    Wonderful Readers!

    NETWORK READERS

Showing posts with label fire. Show all posts

Thursday, December 9, 2010

GUIDELINES FOR VOLCANO SAFETY

Bookmark and Share
It is best for people that live near a volcano to make plans for an eruption. Learn the alert levels issued by your local emergency management office and know what they mean. Listen for emergency updates and instructions, making note of information about hazards you may encounter. Prepare for a possible evacuation. Make additional preparations to shelter in place.

A volcanic eruption can alter the landscape in ways that are difficult to imagine. Near the site, there can be loss of life, and destruction of structures and property. The resulting ash cloud can cause airports to shut down and turn daylight to darkness. Earthquakes, flash floods, wildfires, thunderstorms and tsunamis can all occur as the result of a volcanic eruption.

Memorize the recommended evacuation routes. Maps marked with this route should be kept in each car and another in your home. Select maps with detailed geographical markings of the area surrounding your location. In the United States, hazard zone maps can be secured from the U.S. Geological Survey that will show probable lava flow paths and give time estimates on travel to certain locations along with their relative safety.

Prepare a getaway kit. Include safety goggles and dust masks or bandannas to protect your eyes and lungs from falling ash. Include long sleeved shirts, long pants and sturdy footwear. Keep a well-stocked first aid kit, blankets and warm clothing in a convenient location. With this, keep a battery-powered radio and fresh batteries so that you can still monitor alerts if your power goes out.

Unless you need to evacuate, stay indoors. Bring pets inside and move livestock into shelters. Close all vents, doors and windows for protection from ash and burning cinders. Put damp towels under doorways. Cover downspouts, machinery, electronic devices and computers to protect them from ash that can disable and clog machinery and pipes.

Listen for creaking noises from your roof. Ash will fall silently and can cause the roof to collapse under its weight. Remember to wear a mask and goggles if you go outside to clear ash off of the roof and gutters. Remove your clothing before re-entering the house rather than bring ash inside where it can irritate the airways of everyone indoors.

Keep at least three days worth of water and food in your home. An eruption can contaminate water supplies and you may have to rely upon what you have stored. If you hear that an eruption is imminent, fill all sinks, tubs and containers with water. Rely upon your stored water until your regular source is deemed safe.

If you must drive, use your headlights, proceed slowly at about 35 mph and watch your gauges for signs of an overheating engine. Ash can clog your radiator and other moving parts of an engine. Ash will also make roads slippery. When parked, cover your vehicle with a tarp and place it under a shelter to protect it from the falling ash.

If you must evacuate, turn electricity and gas off at the mains before you leave. Head for higher ground and try to stay upwind so that ash and gases are blown away from you. Volcanoes’ greatest dangers (lava flows, mudflows, poison gases and flooding) all move towards low-lying areas. An elevated area gives you greater protection than any attempt to outdistance the danger.

Afterwards, don’t return home until authorities say it’s safe to re-enter the area. Seek medical treatment for any injuries. The wait for medical treatment will be shorter for those farther away from the disaster site. When cleaning up property after an eruption, dampen the ash before sweeping or shoveling the buildup. This keeps the slippery substance from getting tossed back into the air.

Remember, in the event of an eruption, you may have only moments to react. Being prepared to move quickly and decisively can mean the difference between life and death.


This 4 minute video shows the extent of the destruction
caused by the eruption of Mount St. Helens.


This 17 second video shows Mount St. Helens
erupting in slow motion.

The entire side of the mountain slides to one side.

read more “GUIDELINES FOR VOLCANO SAFETY”

Tuesday, November 23, 2010

DANGERS DURING A VOLCANO

Bookmark and Share
A volcano is a mountain that opens downward to a reservoir of molten rock. When pressure from gases and melted rock becomes strong enough, the mountain erupts in an explosion that spews gases and rocks through the opening. Volcanic blasts can devastate miles of landscape within hours or minutes. Here are some of the things to watch for during a volcanic eruption.

An ASH CLOUD can turn day to night and prevent you from being able to recognize landmarks, coating everything it touches with a dark powder. It is made up of bits of glass and exploded rocks made under extreme temperatures. This corrosive substance does not dissolve and can damage mucus membranes, irritating skin and eyes. Infants and those with breathing problems are most at risk of injury from this. Cover your eyes, nose and mouth.

FALLING ROCKS (pyroclastics) can land miles away from the volcano. Place a ridge line between yourself and the volcano or hold something (backpack, box, trash can lid, your arms etc.) over your head for protection.

FIRES occur wherever burning debris lands onto tinder, spreading quickly.

FLOODING & MUDSLIDES kill more people than the initial blast. Even miles away, these are a danger as normal waterways are clogged or changed by the lava flow, ash and debris.

HEAT is also released with temperatures high enough to burn human flesh. Move away from the blast area to avoid this.

LAVA FLOWS are super-heated molten liquid. Nothing can stop them. Don’t attempt to cross them even if they appear cooled. This could be a thin crust that will give away under your weight. Never try to cross hot spots, mud holes or geysers as the ground surrounding them can be too thin to keep you out of the molten lava below.

POISON GAS and volcanic smog (vog) is the result of sulfur dioxide and other pollutants reacting with oxygen, moisture and sunlight. It can cause lung damage, breathing difficulties, headaches and death. Use a respirator, mask or moist cloth and get away from the area as quickly as possible. DON’T KNEEL OR CRAWL!!! The most dangerous gases often accumulate near the ground.

STRONG WINDS follow an eruption and can be felt miles away from the blast, knocking over trees and structures.

If you live in the vicinity of a volcano, NOW is the time to develop a plan to deal with events in case of an eruption.


Many Indonesians died in the aftermath
of Mount Merapi's eruptions
during October & November 2010.


read more “DANGERS DURING A VOLCANO”

Wednesday, November 10, 2010

DVD REVIEW: "NAKED INTO THE WILDERNESS"

Bookmark and Share
Readers may be interested in seeing an example of how rustic skills can serve you. NAKED INTO THE WILDERNESS gives a good overview of how this is possible. It’s one thing to know how to start a fire or build a shelter, it’s quite another to know how to have a shelter, fire and food without ready-made tools. There’s another level of skill required to know how to utilize the strengths of each individual within a group, take advantage of found materials and manage the variables that weather and terrain can toss your way.

NAKED INTO THE WILDERNESS is a video that demonstrates how primitive skills can be applied in their context. To emphasize the value of each technique, the participants venture into a remote location without iron tools or containers.

Part one takes you into the Kansas woods as you observe skills in several categories. Watch as the individual participants form into a cohesive group, securing food, shelter and the tools they need to accomplish each task.

While stone tools make for a slower work pace, you'll see that a LOT can be accomplished with very few basic materials. Watching this gave me a real appreciation for some skills that modern culture seems to have left behind including:
● basket making
● pottery
● fire-starting
● cooking over an open fire,
● stone knapping to make knives, axes and arrowheads
● cordage
● shelter construction
● foraging
● trapping
● and more

The second part of the video shows another group camp that utilized modern bedrolls and pre-made primitive gear. This footage has some scenes that show how "down time" is used by members of the group to make improvements to the camp. Additionally, there are scenes that show some lighthearted moments. Day 4 contains some silliness as a couple of the guys decide to try swimming in frigid waters. If you'd prefer to pass on some back nudity, skip that section.

The DVD is divided into topical chapter headings so that you will be able to review applicable sections. If you are practicing individual skills, it helps to see them demonstrated in a real life setting -- although this is not a detailed instructional video. You'll also get a pretty good idea of how to prioritize tasks and divide the labor among individuals. NAKED INTO THE WILDERNESS leaves you with an appreciation for how a small tribe or community with few materials and some knowledge can greatly enhance the life of all its members when they are willing to work together.

This is a valuable addition to your library and will work well as a gift if you are interested in these skills for personal use or for demonstration purposes. The production value is not up to the polished standards of a professionally produced work. This is not a video on how to be rescued when lost. Rather, you’ll be invited to enjoy the home movies of experts in primitive skills and gain from their insights. In spite of surface noise distractions, dead air and the occasional “is that thing on?”, there’s a lot to glean from this footage. NAKED INTO THE WILDERNESS takes you from theory to implementation of skills you’ll need to survive in primitive conditions.


Available at Bulk Herb Store.
Click on the image to order.

read more “DVD REVIEW: "NAKED INTO THE WILDERNESS"”

Sunday, September 5, 2010

MAGNESIUM FIRE STARTER STICKS

Bookmark and Share
Magnesium fire starter sticks can help you get a fire going, even in wet conditions. The shavings burn hotter than 1,000°F. This tool is small enough to be kept on a key chain and weighs less than 2 ounces. Similar motor skills as those required to strike a match are all that the user will need to get a spark. Magnesium fire starters respond well to a light touch and finesse rather than blunt force. If the first effort fails, enough magnesium remains on the stick for a few hundred more tries. For these reasons, I think it is an ideal tool for women and children as well as men.

There are three basic components to a magnesium fire starter stick: magnesium, flint and carbon steel. The large, light grey portion is the magnesium. The narrow dark cylinder embedded in one side of the magnesium is the flint rod. The third part of the tool is a separate piece of carbon steel that resembles the blade of a jig saw.

To get a fire started, use the toothed edge of your saw to peel some shavings onto the finest fibers in your tinder nest. Try not to gouge chunks out of the bar. The thinner the shavings are, the easier they are to ignite. Work in an area protected from gusts of wind as these shavings are feather light. If using a knife, utilize the back edge so that you don’t dull the blade of an important tool.

Some instructions recommend creating a dime-sized pile of shavings, but with a well constructed tinder nest, you’ll likely need less. A pile of shavings equal to the size of a pencil eraser may be enough. I recommend that you start with the smaller size and add more shavings if necessary. In this way, you are able to extend the life of your tool.

Hold the magnesium starter in your less dominant hand with the dark flint bar turned upward. Hold the saw blade in your dominant hand, pinching the flat of it between your thumb and forefinger. The narrow edge of the blade will extend just beyond your fingers. Run the short side of the carbon tool across the flint in a downward stroke towards your tinder nest and magnesium shavings. You should immediately see sparks. If they don’t immediately catch, move your hands closer to the magnesium shavings so that there is a better chance of ignition. Hesitate long enough between strikes to check your tinder for a flame.

Another way to coax a spark is to hold the jig blade steady and pull the flint towards your body as you scrape it across the blade, directing the sparks into your tinder bundle. Experiment with both methods to see which is most comfortable and effective for you.
Neither shaving the magnesium nor striking the flint will require you to etch deeply into your tool. If you aren’t having good success and notice that there are deep gouges or an edge that’s worn flat, try a lighter touch.

CAUTION:
Don’t risk holding the tinder nest in your hands when striking a spark with magnesium. It burns so hot that a flaming piece of magnesium could easily burn through human skin all the way to the bone. Instead, allow the magnesium shavings to flare and catch the tinder. THEN you can hold the nest and gently blow, feeding the flame vital oxygen.

Remember, the adrenaline rush of urgent circumstances can decrease fine motor skills, so take the time to get familiar with your fire stick before there is an emergency. Magnesium fire starter sticks can be found at most outdoor retailers for $2 or less. Purchase two of them and practice with one until you are comfortable with it. This small investment of time and money has the potential to save your life.


Here’s a video demonstration of how to start fire using a carbon steel knife with a magnesium fire starter. I don’t recommend gouging at the magnesium in this way, but the process is forgiving and worked for him.

read more “MAGNESIUM FIRE STARTER STICKS”

Saturday, August 28, 2010

HOW TO BUILD A TINDER NEST

Bookmark and Share
Other names for tinder nests are tinder bundles or bird’s nests. Your tinder nest will be used to coax a spark or ember into flame. It maximizes your chances of success in building a fire. Once the nest is burning it is used to start a larger fire.

To construct a tinder nest, select dry and flammable materials. A variety of items can be used from clothes dryer lint, fuzz from socks and sweaters, to foraged materials. Many outdoor enthusiasts carry waterproof containers filled with cotton balls dipped in petroleum jelly for this purpose. Found tinder can include dry grass, cattail fluff, cottonwood down, leaves, thin layers of tree bark, moss, wood shavings, brown leaf litter, dropped pine needles and more. A found bird’s nest will work well also.

Dry tinder will break easily when bent or crushed. If the exterior feels dry, but it gives rather than snaps when bent, the material isn’t truly dry. If the ground is damp, search out materials that are found resting on top of bushes or limbs. These items will be drier than ground litter because they have been exposed to the sun and air.

Place damp tinder inside your jacket, but not next to your skin. By the time you are ready to start a fire later in the day, the tinder will have been dried somewhat by your body heat.

Shredding the tinder creates additional surface area that will more easily catch flame. Materials that are fuzzy are ideal for feeding a spark. Gather the tinder on a bandanna or other cloth. Grab a length of tinder in both hands and move your fists in a bicycle pedaling motion. Work over the entire length of the tinder. The tinder will soften and become pliable. Bits and fine dust will fall down from your hands and be caught on the bandana.

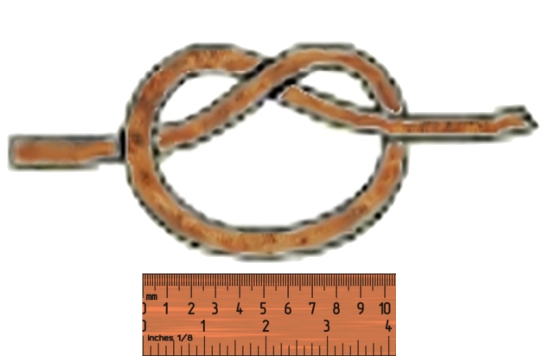
Take some of the coarse pieces of prepared tinder and create a loose over hand knot with a diameter of about four inches.

Stuff the remaining tinder into the knot’s loop. Keep stuffing the nest until it is dense. It must be able to prevent the coal from falling through the fibers and out of the nest and it must provide enough fodder to keep the spark from fizzling out before a flame starts.

Collect the dust that has fallen into your bandanna and place it in the center of the nest. It will help if you first make a small hollow or depression in the center of the nest to contain the dust. As you pick up the dust you will notice that the finest particles fall back down onto the bandanna. This will mean that you'll be packing finer and finer dust into the nest’s depression until the finest dust will be on the top, just where you'll place the spark or ember.

Once your nest is assembled, keep it in a protected area where it won’t be bumped or blown around by the wind. Then assemble the fuel for your fire and prepare to strike a spark.
read more “HOW TO BUILD A TINDER NEST”

Monday, January 4, 2010

HERBS AS INCENSE

Bookmark and Share
In the past, certain herbs such as sage and rosemary were burned to cleanse sick rooms. Cedar is a fragrant wood known to have antiviral, antifungal, expectorant, and lymphatic cleansing properties. Pine, Spruce and Fir needles contain shikimic acid, the main ingredient in Tamiflu, which is used to fight the bird flu. Frankincense is also a known to be very effective incense in the treatment of respiratory ailments. Mullein and Eucalyptus leaves are also beneficial herbs that can be used in this manner.

By slowly burning herbs, the essential oils are released into the smoke and carried into the lungs of those that inhale it. If a person is suffering from bronchial inflammation, the beneficial properties of the herb are applied directly to the inflamed tissue.

I know of one woman that had been dealing with such a strong cytokine response during a bout with the flu that she was choking, vomiting and struggling for air. Her husband closed the damper on their wood stove and tossed some Cedar into the fire, filling the house with smoke. Immediately, the cytokine storm stopped. Within 20 minutes, there was no mucus and she felt as though she hadn’t had the flu at all. They have repeated this remedy with the same result on other family members, airing the house afterwards.

American Indian tribes regularly used Cedar to smoke and cleanse their homes. In rustic conditions, smoke can be used to cleanse a person, clothing, bedding or shelter of vermin, molds, etc. Cedar smoke was one of the ways that priests were instructed to cleanse a house where there had been a plague (cf. end of chapter 14 of Leviticus).

HOW TO BURN HERBS AS INCENSE
Using tongs, place a hot coal or ember from a hard wood fire onto a heatproof dish. Place the herbs onto the hot coal and allow the herbs to smolder. Inhale the resulting smoke. The goal is to encourage the plant material to produce smoke, not to ignite into an open flame. This can be accomplished by only using hot coals (rather than fire) and/or by binding the plant material into a tight bundle.

Tightly bundled herbs are called smudge sticks. Some branches, twigs or leaves are supple enough to form into tight braids. Dried leaves can be secured with twine and unbleached paper. To use a smudge stick, hold one end of it to a flame until it ignites. Then the flame is gently blown out leaving the plant material to smolder and smoke. Smudge sticks are handy as it is easy to direct the smoke and they will tend to burn for a longer period of time.


CAUTION
Do not inhale the smoke of any herb or plant material to which you have known allergies. This article is for information purposes only. Readers that incorporate these methods do so at their own risk and should utilize safety precautions. None of this information is a substitute for professional health care.
read more “HERBS AS INCENSE”

Saturday, November 14, 2009

HOW TO START A FIRE WITH A SODA CAN

Bookmark and Share
I don’t think there is a lot of nutritional value in a can of soda, but the can itself could prove useful in a survival situation. It is possible to use an empty soda can to start a fire. In the event you find yourself in need of fire for cooking or heat, a discarded can could prove most beneficial.

The concave bottom of these cans is designed to give strength to the container. It is possible to polish this surface to a high sheen to create fire. The curved reflective surface is able to collect the sun’s rays and focus them to a single point, igniting flammable tinder.

Once you’ve found an empty pop can, utilize materials you have on hand to polish it to a mirrored gloss. If you have the 0000 steel wool – the finest grade – you will be able to accomplish this with just a few minutes of rubbing. You can also burnish the surface with a baking soda paste, toothpaste or a paste made with scouring powder.


Once this is accomplished, you’ll want to finish with a polish. To polish the surface you can rub it with a bar of chocolate, crayons, candles, Vaseline, or any other waxy material. Apply the material to the bottom of the can and rub with a cloth, repeating this process until you’ve gotten the desired effect. A word of caution, don’t eat the chocolate after it is used for this project as it will have absorbed the aluminum a known toxin.

When the surface has a mirror finish, point it toward the sun. To find the focal point, hold a small scrap of paper between the can and the sun, moving it closer or farther away from the can until the sun’s rays are focused into a small dot of light. Visually mark this spot and hold your tinder there until it begins to smoke and then flame.

You will need about an hour’s time to polish the can’s surface. Igniting your tinder will take less time, depending on the quality of your materials.


This article is provided for information only. The reader assumes all risks and liability in the implementation of these methods and is urged to use common sense and sound judgment in its application.


read more “HOW TO START A FIRE WITH A SODA CAN”

Kay is . . .

a perpetual student of things I find interesting and (I hope) helpful to others. Feel free to use and apply all information with a healthy dose of common sense. :-)


Search By Category


References & FUN

CLICK THE COUPON 2 VISIT iHERB

iHerbButton

ADD KAY 2 UR LIST!

No Greater Joy!

NGJbutton