Kay's Picks

    ↓ WHY I USE iHerb ↓


    Wonderful Readers!

    NETWORK READERS

Showing posts with label skills. Show all posts

Thursday, July 14, 2011

4 STEPS TO SAFE DRINKING WATER

Bookmark and Share
Humans and animals must have water to survive. Securing a safe source of water takes time. Consider how to best invest your resources well ahead of a crisis point. When standard clean water sources are unavailable, here are some ways you can help secure safe drinking water.

1. SELECTION
Choose the cleanest water you can find. Look for a water supply that does not have any obvious debris floating in it. Check to be sure dead animals, sewage, or other bits of organic matter are not easily seen in your water source. Locate a source that hasn't been contaminated by chemical spills.

Some people believe that exposure to various water sources will give you immunity to disease-carrying microbes, making it possible for you to safely drink unfiltered water while traveling. The reality is that some microbes could wreak havoc with your health and cause severe physical damage. There is some truth that limited exposure can build immunity. It is also true that no one wants to become ill unnecessarily. Avoid chemically contaminated water sources as these hazards cannot always be filtered from the water. Don't take risks if you don't have to do so.

2. FILTRATION
Filter the water you collect. There are many ways that water can be contaminated. Not all contaminants are visible. Select a method of filtration to further insure the safety of your drinking water.

With water filtration, there are a range of options from bad to better and best. No single option is practical in every application. Everything from the temperature, sunlight, terrain, individual skill levels and materials on hand will play a role in the safety of the water you consume. Preparation and information is the key to keeping your water supply a source of health rather than a hazard.

3. DISINFECT
Disinfect the filtered water to kill any remaining disease carrying organisms. Once you’ve selected and filtered your water, you will want to heat it to the point of pasteurization. This is about 150 degrees Fahrenheit, several degrees below the boiling point.

Using pasteurization helps to avoid loss of water vapor by boiling. Pasteurization can be done using sunlight by leaving a sealed transparent container of water in direct sunshine from two to four hours. The time depends on the heat of the sun and the surface on which the container is resting.

Without a thermometer, it may be easier to heat the water to boiling to insure it’s disinfected. Use a lid or covered container to avoid loss due to steam. Distilling water by boiling and drinking the condensed steam is the safest way to consume clean water from questionable sources. Proper water distillation insures that the contaminants are left in the original vessel while only pure water moves to the catch vessel.

4. STORAGE
Use safe storage methods. Good drinking water can easily become contaminated by exposing it to a tainted container. If plastic containers have been used for toxic chemicals, it is possible that the plastic could release some of those chemicals back into your carefully cleaned water. Wash glass containers carefully before re-use. Take the time to cover containers to protect the contents from contamination.
read more “4 STEPS TO SAFE DRINKING WATER”

Thursday, April 7, 2011

INTERNET SURVIVAL: PROTECTING YOUR PRIVACY

Bookmark and Share
Privacy is something that you don't realize you need until you've lost it. Here are some ways to maintain your privacy and relative safety on the internet.

You may be sharing more than just a few cute photos when you post an image on the internet. GPS enabled phones can capture images that can accurately reveal your location. All it takes is a few right clicks of a mouse for someone to copy the coordinates, paste them into Google maps and then map the shortest route to view that loved one or prized possession in person. With social network status lines, you could be revealing your CURRENT location and inviting untold numbers of strangers to join you. It’s important to be aware of this even when well-meaning family members are taking pictures of your children.

This video shows you how to disable the GPS tag on your phone photos.


This video covers some of the other dangers to revealing your location to strangers.


It is best if you don’t make public your full legal name, street address, date of birth, telephone number, or Social Security number.

If asked for your name, use initials. Scramble the letters of your name, use nicknames etc. This precaution will also give you a head's-up if you receive spam. If someone addresses you by anything other than your actual name, you will know that this is not someone you know personally.

Never make your street address public. If it is required, offer only what is necessary. Some sites only require a state or region. Adjust your security settings to keep this information private. Only make online purchases from trusted vendors as you will have to give them your address for shipping purposes.

Keep your birth date private. Sites that require your birth date often do so in order to insure you are an adult. If their security is breached, this is a key piece of personal information that someone could use to guess your social security number. Check your security settings and be sure this information is private. Consider using an online birth date that includes your birth year and an alternative month and date. Or you could use your actual month and date with the year previous or following your actual birth year. This will give the host an accurate gauge of your age without opening you up to unnecessary snooping.

Don’t reveal your home telephone number. Refrain from offering this and keep security settings private if it is included in an online profile. If someone discovers your telephone number and knows your full name and birth date, it is possible for them to use these items to add unauthorized charges to your bill.

Your social security number shouldn’t be given out unless it is absolutely necessary and to a verified financial or medical institution that you called. Always ask if you can offer an alternative number. Decline to give your number to someone that calls you.

Protect portable electronic devices with passwords. Use upper and lower case letters, numbers, and symbols. Don’t tell your device to remember your user name and password. Don’t store financial information on portable devices. Always log off when you’re finished. If your laptop or phone is lost, it’s harder for someone to access your personal information or clean out your accounts.

Internet safety is basically taking the time to cultivate good habits. Posting something on the internet is just like putting something on a very public bulletin board. The time you take now to develop these habits will protect you and your family later.

Bonus tool for readers with children:
Here’s one of my favorite tools for school aged children that want to do internet research. Make Quintura for Kids the home page on your internet browser. This search engine filters out undesirable "adult" content and reviews approved sites regularly. We’ve used it successfully at our house and recommend it to other households with children. It provides a safe way for kids to do searches without awful content and images surprising them. Try Quintura for Kids out for yourself at quinturakids.com.

Note: Quintura won’t prevent users from going to inappropriate internet addresses that they know how to get to. You’ll need another type of filtering service for that application. Check out this article for some additional suggestions for user accountability helps.
read more “INTERNET SURVIVAL: PROTECTING YOUR PRIVACY”

Friday, April 1, 2011

THE PRICE OF PARALYZING FEAR

Bookmark and Share
Strong emotions in charged circumstances bring about visceral responses that are not planned or calculated. These strong emotions are dominant and can cancel out intellectual responses. This is true whether you are dealing with a child delighted with a long-desired gift, a young lady surprised with a marriage proposal, an athlete celebrating a victory, or a person who finds himself in need of rescue.

An experienced teacher will tell you that all learning stops the moment a student becomes overly emotional. A distraught person can’t be expected to make considered logical choices. Whether someone is dancing in delight, or wailing in dismay, unchecked emotions make it impossible for that person to respond in a calculated, intellectual way.

I’ve recently viewed footage of people who have had their cars towed to an impound lot. These individuals must navigate a confusing maze of legal and financial requirements before taking possession of their vehicle. The circumstances are varied, but one thing is common: these people are under stress.

For those who are able to calm themselves, setting aside feelings of victimization and anger, the results are fairly straightforward. They determine what is required for the release of the vehicle, go about getting their affairs and documents in order, and then return to claim their car.

For those unable to calm themselves, the process becomes more tedious and lengthy. They direct their frustration at the workers in the office. Aggressive body language, raised voices and accusations fly back and forth as workers try to tell the car owner what he or she will need. Often, the person only hears one or two instructions before emotionally shutting down. They leave and return several times as they collect one or two of the documents they need each time. The stress level of the worker starts to rise as he or she responds to the upset customer. This leads to mistakes and omitted information on the worker’s part.

Fear impairs mental function in the form of confusion, forgetfulness, and the inability to concentrate. In this state, a person can be numbed by shock, begin to panic, or lash out in anger. When seconds count, a fearful person may cause others in his party to lose their life. It may be necessary to leave him behind for the sake of the group’s safety.

I find that the most recommendations for survival safety focus on two concepts: faith and preparation. The more important of the two is faith. Why? In survival circumstances, the truth you know about God and about man will have a powerful impact on your behavior. A person of faith won’t waste as much time second-guessing and railing against the circumstances.

Faith is the opposite of fear. Faith moves us towards life. Faith reminds us of the One in whom our trust is placed. Faith tells us that we are not alone.

Once your fear response calms, your preparation will kick in. If you’ve practiced thinking on your feet, making decisions on the fly, and dealing with various terrains, you will find yourself well-served by your time invested in these pursuits. However, if you are not able reign in your emotions, all of that preparation may likely do you no good.

I found an account of an interview of survivors of the 2004 Indonesian tsunami. The reporter stated that it occurred to her that everyone sitting in that room lived because they ran to the mountains. Those that did not move immediately died. It reminded me of the scripture that reads, “And let him that is on the housetop not go down into the house, neither enter therein, to take any thing out of his house: And let him that is in the field not turn back again for to take up his garment” (Mark 13:15,16).

Fear used properly can be a lifesaver. As a master, fear can kill. Learn truth. Build your faith and be prepared. When circumstances seem dire, these steps will equip you to respond.
read more “THE PRICE OF PARALYZING FEAR”

Tuesday, January 11, 2011

DEBRIS HUT BASICS

Bookmark and Share
A debris hut is a structure constructed of found materials that can include leaf matter, branches, grasses and even snow. The insulated walls shield a person from cold and weather, serving as a combination sleeping bag and shelter. Using natural resources, a debris hut can be assembled in nearly any location. These can be used as an emergency shelter or a temporary shelter while you work to secure a more permanent structure.

While advanced skills are not required, experience and a good work ethic can be invaluable. A good training exercise is to construct a model from small sticks to get a good idea of what will be required for a full scale shelter. Another good idea is to build a full sized model using a time limit. In a survival situation, you may be limited by how much daylight is left in your day. Having a time limit will help you prioritize and work efficiently. Spending the night in your creation will quickly tell you which elements were lacking such as location, size, insulation, waterproofing, door construction, or bedding.

When deciding where to locate your debris hut, it is best to select an area that is a safe distance away from water sources. These could flood or dampen your shelter. Check the wind direction and position the entrance away from the prevailing wind. An open area that receives optimum sunlight surrounded by a stand of trees acting as a wind break is ideal. Keep the entrance small to help retain heat. A small fire at the entrance of your shelter will help keep you dry and warm.

When constructing a debris hut, smaller is better. This saves on construction time, materials needed and the smaller space is easier for you to warm with only body heat. Make it large enough for you to wiggle into feet first. To size the structure, lie on the ground and mark the outline of your body.

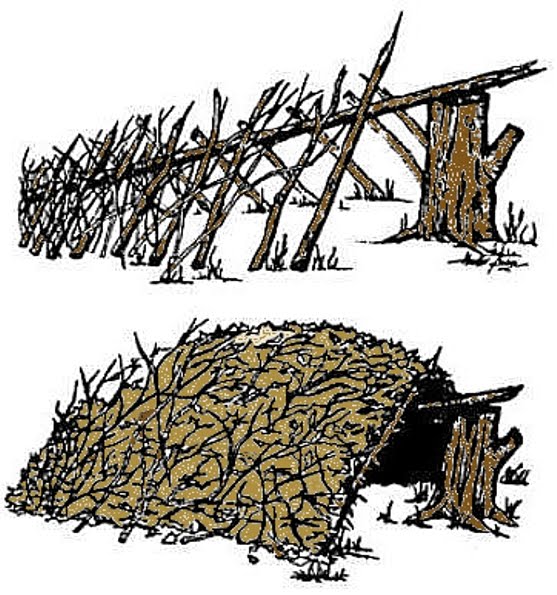
It is good to gather more material than you think you will need as the walls should be as thick as your arm’s length. Straight tree branches with leaves removed can be pounded into the ground to form your basic frame. A common method is to construct an A-frame for the entrance. This can be lashed together to form a support for the ridge pole and additional branches can be propped against the ridge pole to form the ribbing of the frame. On top of this, the debris is piled and woven to insulate and waterproof the shelter. If you have some thick plastic sheeting, use it to help waterproof your hut.

Every survival circumstance has unpredictable variables. Within these variables the human body needs to be protected from a loss of warmth that can lead to death. Knowing how to make a debris hut can truly be a lifesaver. Make a game of it and see what sort of structure you are able to construct from the things you find in your own backyard. Take the time to visit a wilderness area near your home and practice working as a group to build a structure. Once you’ve slept in your creation, you will know if there are things that need to be reworked. These fun activities can give you invaluable experience in the event of an emergency.


Dave Canterbury demonstrates how to construct a type of debris hut called a spider shelter in this short video.


The Wendell family demonstrates how a woman was able to construct her own debris shelter and overnight comfortably with her children in the structure.


read more “DEBRIS HUT BASICS”

Wednesday, November 10, 2010

DVD REVIEW: "NAKED INTO THE WILDERNESS"

Bookmark and Share
Readers may be interested in seeing an example of how rustic skills can serve you. NAKED INTO THE WILDERNESS gives a good overview of how this is possible. It’s one thing to know how to start a fire or build a shelter, it’s quite another to know how to have a shelter, fire and food without ready-made tools. There’s another level of skill required to know how to utilize the strengths of each individual within a group, take advantage of found materials and manage the variables that weather and terrain can toss your way.

NAKED INTO THE WILDERNESS is a video that demonstrates how primitive skills can be applied in their context. To emphasize the value of each technique, the participants venture into a remote location without iron tools or containers.

Part one takes you into the Kansas woods as you observe skills in several categories. Watch as the individual participants form into a cohesive group, securing food, shelter and the tools they need to accomplish each task.

While stone tools make for a slower work pace, you'll see that a LOT can be accomplished with very few basic materials. Watching this gave me a real appreciation for some skills that modern culture seems to have left behind including:
● basket making
● pottery
● fire-starting
● cooking over an open fire,
● stone knapping to make knives, axes and arrowheads
● cordage
● shelter construction
● foraging
● trapping
● and more

The second part of the video shows another group camp that utilized modern bedrolls and pre-made primitive gear. This footage has some scenes that show how "down time" is used by members of the group to make improvements to the camp. Additionally, there are scenes that show some lighthearted moments. Day 4 contains some silliness as a couple of the guys decide to try swimming in frigid waters. If you'd prefer to pass on some back nudity, skip that section.

The DVD is divided into topical chapter headings so that you will be able to review applicable sections. If you are practicing individual skills, it helps to see them demonstrated in a real life setting -- although this is not a detailed instructional video. You'll also get a pretty good idea of how to prioritize tasks and divide the labor among individuals. NAKED INTO THE WILDERNESS leaves you with an appreciation for how a small tribe or community with few materials and some knowledge can greatly enhance the life of all its members when they are willing to work together.

This is a valuable addition to your library and will work well as a gift if you are interested in these skills for personal use or for demonstration purposes. The production value is not up to the polished standards of a professionally produced work. This is not a video on how to be rescued when lost. Rather, you’ll be invited to enjoy the home movies of experts in primitive skills and gain from their insights. In spite of surface noise distractions, dead air and the occasional “is that thing on?”, there’s a lot to glean from this footage. NAKED INTO THE WILDERNESS takes you from theory to implementation of skills you’ll need to survive in primitive conditions.


Available at Bulk Herb Store.
Click on the image to order.

read more “DVD REVIEW: "NAKED INTO THE WILDERNESS"”

Thursday, September 30, 2010

FIVE POINTS FOR PERSONAL SAFETY

Bookmark and Share
Personal safety has a lot to do with not taking unnecessary risks. While there’s no guarantee that you will never be in an emergency situation, you can take steps to discourage attackers and make rescue more likely. This is an abbreviated list of some things you can do to stay a little safer as you move from place to place.

PREPARATION
• Leave written details of your travel plans with two trusted friends who will notify searchers if you deviate from your itinerary.
• Carry a noisemaker like an electronic device, personal alarm or a whistle. If you have one, use the car alarm button on your key chain.
• Carry a heavy duty flashlight, pepper spray, or even a walking stick. Check laws in your area. In the event of an attack, be prepared to use your choice of device or it could be used against you.

POCKETS
• Avoid carrying a purse or wallet. These are targeted by thieves.
• Use several front pockets for valuables to avoid total loss if robbed.
• Keep emergency money in unexpected places such as shoes, bra, money belt, etc.
• Carry purse or backpack on arm opposite the roadway to make it more difficult for a motorist or bike rider to grab.

PEOPLE
• Walk with confidence keeping your head up, eyes at nose level, alert and with purpose. Attackers look for easy, fearful targets.
• Don’t engage in conflicts that can escalate into physical contact. Criminals sometimes work in packs and try to manipulate someone with a quick temper into striking first. Later, they claim that their assault on your person was self-defense. When you have the option, walk away rather than fight.
Don’t travel alone. Have at least one other person for a walking partner.
• Treat people with respect. Arrogant strutting alienates people that could help you.
• Be willing to learn. Ask questions, seek advice from locals.
• Express gratitude. Say thank you.
• Don’t wear expensive clothing and jewelry unless necessary.
• Avoid drawing attention to breasts, belly or thighs by wearing garments that expose them. Wise clothing choices keep you from being overly attractive to predators and give you freedom to access more locations that may have a dress code. Collared shirts (not sleeveless) and long pants are a good choice for men.

PLACES
• Be aware of your surroundings. Dark lonely places are best avoided. Stay in well lit, populated areas. This is a safer route, even if it takes a bit longer.
• If you see criminal activity occurring, leave the area. Some authorities arrest everyone and ask questions later.
• Public transportation and crowded areas require heightened awareness. These places allow people to jostle and bump into you – perfect opportunities for a thief.
Don’t tune out. Wearing a headset cuts you off from your surroundings, making it easy for an attacker to sneak up on you. When walking alone, don’t listen to electronic devices.

PROTECTION
• Learn some simple, easily performed defense tactics. You don't need to know how to beat an attacker, only how to buy yourself enough time to get away.
• MAKE NOISE if assaulted. Attackers hate attention-making noise. Don't underestimate the power of one person who may come to your aid if they hear you.
Practice yelling at top volume. Tell what is happening, give lots of details and describe your attacker while yelling “Call 911!” Repeat these as often as possible as a command. Witnesses don’t always know what to do and are more likely to respond to instructions than to pleas for help. Your assailants may be so stunned to hear you describe them that they run away.


These short videos below feature Captain Steve Pearl
who elaborates on more safety measures that anyone can employ.


read more “FIVE POINTS FOR PERSONAL SAFETY”

Sunday, September 5, 2010

MAGNESIUM FIRE STARTER STICKS

Bookmark and Share
Magnesium fire starter sticks can help you get a fire going, even in wet conditions. The shavings burn hotter than 1,000°F. This tool is small enough to be kept on a key chain and weighs less than 2 ounces. Similar motor skills as those required to strike a match are all that the user will need to get a spark. Magnesium fire starters respond well to a light touch and finesse rather than blunt force. If the first effort fails, enough magnesium remains on the stick for a few hundred more tries. For these reasons, I think it is an ideal tool for women and children as well as men.

There are three basic components to a magnesium fire starter stick: magnesium, flint and carbon steel. The large, light grey portion is the magnesium. The narrow dark cylinder embedded in one side of the magnesium is the flint rod. The third part of the tool is a separate piece of carbon steel that resembles the blade of a jig saw.

To get a fire started, use the toothed edge of your saw to peel some shavings onto the finest fibers in your tinder nest. Try not to gouge chunks out of the bar. The thinner the shavings are, the easier they are to ignite. Work in an area protected from gusts of wind as these shavings are feather light. If using a knife, utilize the back edge so that you don’t dull the blade of an important tool.

Some instructions recommend creating a dime-sized pile of shavings, but with a well constructed tinder nest, you’ll likely need less. A pile of shavings equal to the size of a pencil eraser may be enough. I recommend that you start with the smaller size and add more shavings if necessary. In this way, you are able to extend the life of your tool.

Hold the magnesium starter in your less dominant hand with the dark flint bar turned upward. Hold the saw blade in your dominant hand, pinching the flat of it between your thumb and forefinger. The narrow edge of the blade will extend just beyond your fingers. Run the short side of the carbon tool across the flint in a downward stroke towards your tinder nest and magnesium shavings. You should immediately see sparks. If they don’t immediately catch, move your hands closer to the magnesium shavings so that there is a better chance of ignition. Hesitate long enough between strikes to check your tinder for a flame.

Another way to coax a spark is to hold the jig blade steady and pull the flint towards your body as you scrape it across the blade, directing the sparks into your tinder bundle. Experiment with both methods to see which is most comfortable and effective for you.
Neither shaving the magnesium nor striking the flint will require you to etch deeply into your tool. If you aren’t having good success and notice that there are deep gouges or an edge that’s worn flat, try a lighter touch.

CAUTION:
Don’t risk holding the tinder nest in your hands when striking a spark with magnesium. It burns so hot that a flaming piece of magnesium could easily burn through human skin all the way to the bone. Instead, allow the magnesium shavings to flare and catch the tinder. THEN you can hold the nest and gently blow, feeding the flame vital oxygen.

Remember, the adrenaline rush of urgent circumstances can decrease fine motor skills, so take the time to get familiar with your fire stick before there is an emergency. Magnesium fire starter sticks can be found at most outdoor retailers for $2 or less. Purchase two of them and practice with one until you are comfortable with it. This small investment of time and money has the potential to save your life.


Here’s a video demonstration of how to start fire using a carbon steel knife with a magnesium fire starter. I don’t recommend gouging at the magnesium in this way, but the process is forgiving and worked for him.

read more “MAGNESIUM FIRE STARTER STICKS”

Saturday, August 28, 2010

HOW TO BUILD A TINDER NEST

Bookmark and Share
Other names for tinder nests are tinder bundles or bird’s nests. Your tinder nest will be used to coax a spark or ember into flame. It maximizes your chances of success in building a fire. Once the nest is burning it is used to start a larger fire.

To construct a tinder nest, select dry and flammable materials. A variety of items can be used from clothes dryer lint, fuzz from socks and sweaters, to foraged materials. Many outdoor enthusiasts carry waterproof containers filled with cotton balls dipped in petroleum jelly for this purpose. Found tinder can include dry grass, cattail fluff, cottonwood down, leaves, thin layers of tree bark, moss, wood shavings, brown leaf litter, dropped pine needles and more. A found bird’s nest will work well also.

Dry tinder will break easily when bent or crushed. If the exterior feels dry, but it gives rather than snaps when bent, the material isn’t truly dry. If the ground is damp, search out materials that are found resting on top of bushes or limbs. These items will be drier than ground litter because they have been exposed to the sun and air.

Place damp tinder inside your jacket, but not next to your skin. By the time you are ready to start a fire later in the day, the tinder will have been dried somewhat by your body heat.

Shredding the tinder creates additional surface area that will more easily catch flame. Materials that are fuzzy are ideal for feeding a spark. Gather the tinder on a bandanna or other cloth. Grab a length of tinder in both hands and move your fists in a bicycle pedaling motion. Work over the entire length of the tinder. The tinder will soften and become pliable. Bits and fine dust will fall down from your hands and be caught on the bandana.

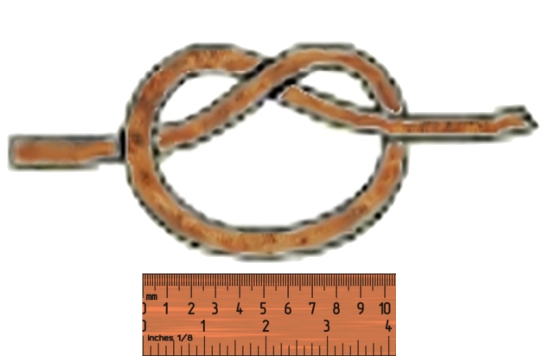
Take some of the coarse pieces of prepared tinder and create a loose over hand knot with a diameter of about four inches.

Stuff the remaining tinder into the knot’s loop. Keep stuffing the nest until it is dense. It must be able to prevent the coal from falling through the fibers and out of the nest and it must provide enough fodder to keep the spark from fizzling out before a flame starts.

Collect the dust that has fallen into your bandanna and place it in the center of the nest. It will help if you first make a small hollow or depression in the center of the nest to contain the dust. As you pick up the dust you will notice that the finest particles fall back down onto the bandanna. This will mean that you'll be packing finer and finer dust into the nest’s depression until the finest dust will be on the top, just where you'll place the spark or ember.

Once your nest is assembled, keep it in a protected area where it won’t be bumped or blown around by the wind. Then assemble the fuel for your fire and prepare to strike a spark.
read more “HOW TO BUILD A TINDER NEST”

Tuesday, August 17, 2010

SIGNS OF DEHYDRATION -- WHY YOU NEED WATER

Bookmark and Share
The human body can live for approximately 3 days without water, but this doesn’t mean it will be functioning at full capacity. Dehydration is the condition that exists when your body begins to lose more water than you drink. The body looses water primarily through perspiration, respiration and elimination of waste. Long before you feel thirsty, you can actually begin to dehydrate. Even slight dehydration will impair your health.

Diuretics such as alcohol, beer, coffee, tea and caffeine increase the amount of water lost in these natural processes. Drinking salt water increases the amount of salt in your body and forces fluids from your organs in order to dilute it. This diminishes your body’s fluids at a greater rate than if you hadn’t drank anything.

Without the proper amount of water, metabolic processes slow. The water content of your blood decreases and it thickens to the consistency of sauce. This increases the strain on your circulatory system. Blood pressure can fall to dangerously low levels. Blood clots may form. Normal kidney function can be impaired.

Fatigue and thirst occur if the water content of your body drops by only 2%. Other symptoms include things like lethargy, headaches, dizziness, muscle cramps, loss of appetite, mental fuzziness and depression. Any difficulty functioning emotionally or physically is made more severe by mild dehydration.

As dehydration becomes severe, your mouth will feel quite dry. This is known as "cotton mouth," and you may notice a crease forming on your tongue. The frequency and volume of urination will decrease. Your urine will take on a deep yellow or orange color and have a strong odor. As dehydration progresses, your eyes will become dry and sunken; your heart rate will increase.

In severe cases urination will stop completely. Lethargy will increase, along with irritability, and you will become nauseated. Vomiting will dehydrate you even more. Once your condition becomes severe with water levels dropping by more than 10%, a failure to rehydrate is fatal.

The time to prevent dehydration is before you are threatened with a lack of proper drinking water. Take the time to learn how to filter AND disinfect found water sources with basic tools. Become skilled in locating natural water sources. It’s not a good idea be left trying to remember untested skills and information while you are suffering from mental confusion brought on by dehydration. Not only is it frustrating, bickering among dehydrated group members with poor thinking skills can be deadly. When you find yourself in survival situation, you’ll be very thankful you took the time to see to this basic need.
read more “SIGNS OF DEHYDRATION -- WHY YOU NEED WATER”

Saturday, July 31, 2010

5 WAYS TO GET ALONG WITH DIFFICULT PEOPLE

Bookmark and Share
Some people are just easier to work with than others. In a survival situation, lives can depend upon successfully navigating a challenging relationship. These methods can help.

FIRST – REALIZE THAT YOU AREN’T THE ONLY PERSON WITH THIS PROBLEM.
Many difficulties arise when someone is convinced of his ‘chronic uniqueness.’ This is the belief that one’s history, circumstances, wants, needs, requirements and desires are so different that no one could possibly understand or be trusted to make decisions affecting him. Telling this person he is mistaken will place him on the defensive and cause more time-consuming conflict. Recognize this self-deception for what it is and avoid taking offense when you see it in others while guarding against it in your own thinking.

SECOND -- DON’T EXPECT OTHERS TO SOOTHE YOUR EMOTIONS.
Others shouldn’t have to listen to you whine. It sounds harsh, but lives could be at risk. Your companions don’t need to be reminded of your emotional turmoil at every opportunity. Your willingness to avoid complaining will add to your value as a team member. Save the details of your inner struggles for a journal. Communicate information as it is necessary. Endeavor to be an encourager. Conversing about the positive points of your circumstance is a way to redirect your thoughts while helping others.

A mural in the rotunda of Oregon's State Capitol
shows the Lewis and Clark Expedition
arriving at Celilo Falls on the Columbia River in 1805.


THIRDACCEPT YOUR RESPONSIBILITY IN THE MATTER.
If you habitually blame others for conflict, it places the group dynamic at risk. It ISN’T just the other person’s problem. Red flags that you are contributing to difficulties are if someone avoids your company, finds excuses for leaving the area when you arrive, or routinely discounts your input. If this is the case, here are a couple of steps that may help:

STEP ONE: Stop spreading the dirt.
When people discuss their difficulties with others, it is in your best interest to change the subject and not take part in such conversations. If your team member suspects you are speaking about him, it will cause a rift. This broken trust can lead to resentment that is displayed in actions and attitude. Your companion becomes just what you painted him to be by responding to your damaging words.

STEP TWO: Focus on strengths and abilities.
Look for opportunities to say something genuinely positive about your team member. Do this even if he is not within earshot. It helps YOU to take inventory of strengths and abilities rather than cataloging irritating traits. Refocus your thoughts when you find yourself falling into this habit. This will help you be less abrasive towards this person without having to put on a front.
FOURTH – DON’T OFFER PLATITUDES AND EXPECT A GOOD RESPONSE.
Many people think social niceties are essential for good group dynamics. A crumbling group dynamic isn’t helped when pleasantries are extended without underlying goodwill. Nice manners ALONE aren’t enough to smooth over serious fractures – and poor manners aren’t a serious enough offense over which to engage in a bitter battle.

FIFTH – BE WILLING TO LOSE THE BATTLE IN ORDER TO WIN THE WAR.
Often, both parties are too proud, too bitter or too hostile to reconcile their differences. Remember, the goal is to survive, not to be proven right. Don't nag or pressure others to conform to your way of thinking. It’s true: ‘A man convinced against his will is of the same opinion still’ -- AND . . . he’s pretty ticked off at being manipulated.

When you set an example of flexibility and refuse to hold grudges, you inspire others to follow your lead. Set aside behaviors that cause conflict and demonstrate your willingness to contribute to the welfare of the group. Your willingness to patiently make an effort to get along can help make the best of a bad circumstance.
read more “5 WAYS TO GET ALONG WITH DIFFICULT PEOPLE”

Thursday, July 15, 2010

GUIDELINES FOR EMERGENCY WATER STORAGE

Bookmark and Share
The human body can only survive three days without drinking water. This makes water a crucial aspect of emergency preparedness.

In most homes, nearly 25 gallons of water per day is used by each person. This includes water used for drinking, cleaning, flushing and cooking. Additionally, most of the systems which supply water to these homes are dependent on electricity. Even properties with wells often utilize electric pump systems. So, water storage is important should the power grid go down.

It is recommended that you evaluate your family’s needs for a seven day period. If you are careful with your water use, you should be able to manage with 2 to 3 gallons of water per person in very warm climates. Half of this will be drinking water. The other half will be used for cooking and hygiene. You may not drink this much water currently, but keep in mind that other sources of beverages may not be available. Additionally, you will be adjusting to living without the benefit of items like air conditioning and electric fans. You will need to replace water lost through perspiration and respiration.

If you know ahead of time that you may lose your supply of water, take the opportunity to fill bathtubs, sinks, ice chests and any other container you have that is strong enough to hold water without leaking. Separate your water into two categories: drinking and all other.

It is advisable to prepare for at least seven days without water. This means that each member of your family will need 21 gallons of water in storage. To be safe, you may wish to double this amount. A family of 5 would require 105 gallons of water in storage. Twice that amount would be 210 gallons. So, two or four, 55 gallon drums would meet your storage needs.

A gallon of water weighs a little less than 8.5 pounds. This is an important consideration for storage and transportation. Quantities of water are best stored on a reinforced concrete floor as 55 gallons of water (not including the weight of the drum) would weigh almost 500 pounds. This is too heavy for most other flooring systems.

If you are unexpectedly without water, there are places in your house that contain useable water. Most hot water heaters hold about 40 gallons of drinkable water. The tank portion of the toilet also has water that is useable for some non-drinking purposes. Ice cubes in the freezer are another source. Don’t throw away the water found in canned goods as it is another valuable source of hydration when every drop counts.

Water can be collected from downspouts or in a child’s wading pool during a rainstorm. You can leave a clean bedspread or sheet out during the rain or overnight on the grass to collect the dew. Wring it out over a storage container. Non drinking water sources include water from the toilet bowl and the waterbed mattress.

Take time now to plan ahead for possible water shortages. Get creative with ways to replenish your stored water once the faucet is turned off. Train yourself and your family members to conserve the water you DO have.
read more “GUIDELINES FOR EMERGENCY WATER STORAGE”

Friday, July 2, 2010

TREATMENT FOR SWOLLEN FEET AND HANDS

Bookmark and Share
Mobility and ease of movement are greatly impeded by inflammation and swelling. In urgent circumstances, this can be dangerous. Swelling indicates that more fluids are being delivered to the area than it is possible for your lymphatic system to carry away. Rather than leave the fluids there to stretch and strain the tissues, there is a way to reduce the swelling and recuperative time.

You can create a biological pump.

Fill a bucket with icy water and another container with the warmest water you can endure. Place your swollen limb into the cold water and allow your limb to soak for several minutes. Then move the limb into the warm water soak for several minutes. Continue to do this until you are relieved of the swelling.

I have found that inexpensive foam ice chests are useful for this application as they are large enough to hold a sufficient volume of water and maintain the heat or coolness of the water over a 30 minute session (or longer). If this is not an option in a remote location, find a container that can hold warm water and move between a cold running stream and the heated container of water. You may even substitute heated rocks wrapped in an insulating cloth as your source of warmth and a frozen towel for a cold wrap.

The point is to repeatedly cool and warm the limb. The heat draws oxygenated blood to the area and relaxes the tissue. The ice shrinks the tissues and helps move fluids away from the limb. Done repeatedly, it increases the movement of fluids away from the area, promoting healing and increasing the range of motion.

You may still need some time to regain strength in the limb, especially if there has been structural damage. However the healing will progress at a faster rate when swelling and inflammation are reduced.

Of course, the primary defense against a swollen limb is to prevent its occurrence.

Poor movement mechanics and a lot of sitting can lead to a tendency towards swellings. Additionally, this can contribute to arthritis pain, poor bone density and tension in the neck, eyes, and jaw. These are common symptoms among populations that have a sedentary lifestyle with brief interludes of intense exercise. In cultures that require movement throughout the day this is not the norm. The human aging process is not naturally characterized by these symptoms.

When your feet or hands swell, it is an indication that toxins and waste material have accumulated in the area. With the regular use of your muscles, the circulatory and lymph systems can become healthy enough to flush the area free of toxins and bring nourishment to the tissues. Not using muscles means that these functions cannot be carried out as they were designed, and this makes you prone to injury and disease.

The good news is that the function and health of your body can be improved when you change your behavior with respect to the design. So, if you haven’t been utilizing muscle groups, it’s not too late to start. Your ability to take care of yourself and your loved ones is improved with physical fitness.


This guide is written for information purposes only and not meant as a substitute for skilled health care. When incorporating these methods, a reader must be informed, utilize good sense and be aware that he assumes all liability.
read more “TREATMENT FOR SWOLLEN FEET AND HANDS”

Thursday, June 24, 2010

EVALUATING CHARACTER IN A CRISIS

Bookmark and Share
When determining your options in an emergency, those who trust the all-knowing God can pray for wisdom to know the best course of action and maintain composure. Additionally, there are skills you can practice to evaluate character in a crisis.

Make mental notes of the demeanor and behaviors of anyone that attempts to take charge. Observe these things closely while discussing a topic that is not controversial. What is the tilt of the head, the posture, the position of the shoulders, arms, hands, legs and feet? How does this person stand or sit? Notice the eyes, the lines around them and the lift of the eyebrows. Notice the thickness of the upper lip and whether it suddenly becomes thinner when certain topics are broached.

Which way is the torso facing? Individuals are more likely to turn their abdomen towards someone they care for or trust. Face the person trying to persuade you and observe his stance. If he turns his shoulder towards you, this is known as giving someone the ‘cold shoulder.’ It can be an indicator that the person is uncertain of his words, or he may be hiding something. Someone who suddenly leans backwards is displaying a desire to retreat from a topic. Alternately, leaning forward during a topic can mean that the person is very interested in the subject and the person to whom they are speaking. A turn in the conversation that results in hands clasped in front can mean that the person is trying to appear smaller and retreat from the discussion.

Any change or movement away from the established baseline could indicate that you aren’t hearing the whole story.

If poor lighting prevents you from seeing, use your ears to help determine a person’s truthfulness. Listen for verbal clues that reveal the true intent.

Use of the word ‘but,’ can indicate something is hidden. Statements like, “Some people might think I’m wrong, but” raises questions about who would disagree and their reasons for doing so.

How does the person answer yes or no questions? Do you get a solid yes or no followed by an explanation? Or does the person lead with qualifications? An example might be – Question: ‘Are you telling me the truth?’ Truthful answer: ‘Yes’ or ‘No.’ A suspect answer would be: ‘I would NEVER lie to you. You know that.’

A third verbal indicator is when someone laughs when asked a serious question. ‘Are you certain this is our best course?’ followed by a chuckled ‘YES!’ is a reflexive way to cover doubts, allay fears and try to encourage the group. A more honest answer might be a sober ‘I’m as certain as I can be with my limited experience under these conditions.’ Keep in mind that a group is more easily led when a person displays confidence, so the first answer may not be a deal breaker.

A fourth verbal indicator to watch for would be the choice of words used by the individual. ‘I realize you aren’t convinced that I’m being honest with you,’ contains the phrase ‘I’m being honest with you.’ The statement, ‘I understand it’s easier for you to think that I would lie to you,’ has the phrase ‘I would lie to you.’ These are unintended keys to the truth. The first statement is likely a truthful one while the second statement is suspect.

These helps aren’t comprehensive. Used alone, they aren’t enough reason to ignore sound advice – even if it comes from a less than honest person. Like doctors delivering bad news, an individual may simply loathe to tell you the full story, believing it best not to worry you. Consider the whole picture and what you know of the character of the person before deciding whether to follow. Nevertheless, it helps to know when a person is being forthright.
read more “EVALUATING CHARACTER IN A CRISIS”

Monday, June 14, 2010

MEASURING DAYLIGHT BY HAND

Bookmark and Share
When you are outdoors or living with limited (or no) electricity, tasks are measured by how much daylight remains. Light from the sun is necessary in order to accomplish many duties. Knowing how much natural light remains in the day will tell you how to set your priorities regarding things such as shelter and fire.

This is important, especially if you are accustomed to a routine that includes things like a late evening meal with time to relax afterwards. The preparation and cleanup will best be done while the sun is still shining and you are able to see what you are doing. It is NO FUN to wake up the next day to soiled cookware because there wasn’t enough light to do the job right the night before. Ask anyone that has tried to set up a shelter in the dark, and you will quickly hear enough stories to make you want to avoid that scenario also.

To estimate how much daylight remains, locate the sun in the sky without looking directly at it. Fully extend your arm and turn your hand to look at your palm with your fingers pointing to the side. Measure how many finger-widths of space there are between the bottom edge of the sun and the horizon line. For every width of a finger you can place between the sun and the horizon, there is approximately 15 more minutes of daylight. So, if you had a single span of your hand between the sun and the horizon, there is about an hour (4 fingers X 15 minutes) before sunset.

In the morning hours this method can be used to estimate how much time has passed since sunrise. Additionally, measuring the distance of the sun from both the eastern and western horizons, will give you a good general idea of the length of time you will between have sunrise and sunset. Half of that time will give you the hours between sunrise/sunset and mid-day. This valuable tool will help you avoid becoming so consumed with any single task that you run out of time to accomplish other important things.
read more “MEASURING DAYLIGHT BY HAND”

Thursday, May 20, 2010

SWEATING IN A SURVIVAL SITUATION

Bookmark and Share
Thermoregulation is a skill that is valuable to have in an outdoor situation. Thermoregulation is the ability to keep body temperature within certain boundaries, even when the ambient temperature is very different.

A first step towards thermoregulation is to remain calm. A panicked person will have an increased heart rate and the urge to move quickly. The reason to avoid this is because heavy activity will cause the body to perspire and lose valuable water. Additionally, sweat will dampen clothing. Wet clothing will speed hypothermia after sunset, when temperatures begin to fall. This is a consideration EVEN IF you are in the middle of the summer season because evening temperatures can rapidly decline. Perspiration dampened clothing can contribute to skin irritation and blisters.

Knowing how to heed your body’s signals regarding thermoregulation is a life-saving skill. If you begin to perspire, loosen and remove outer garments. This will help keep clothing and skin dry. Watch members of your group and encourage them to remove layers also. If you find that the temperatures are very warm, a dampened cloth across your neck is one method that will help you avoid heat exhaustion.

Avoid working at full capacity as this will create a greater need for drinkable water to replace the hydration you have lost. Work at 60% of your capacity – the point just before you break into a sweat. In a survival situation, it is better to learn the art of steady, plodding activity that brings gradual results, rather than racing to finish each task.

Using this method, construct a shelter, make a fire and prepare for nightfall. When the temperatures drop, re-apply the extra clothing that was not needed during the day.


The following video by Spencer Two Dogs discusses Thermoregulation.


read more “SWEATING IN A SURVIVAL SITUATION”

Wednesday, March 24, 2010

HOW TO RELEASE A ZIP TIE

Bookmark and Share
Who knew there were three different ways to get out of a zip tie restraint? I didn’t until I looked into it. These skills are fun to use as tricks for amusement. However, if you find yourself being held by bad guys, it can be a lifesaver. Knowing this information may help you resist the urge to panic in a dangerous circumstance. And THAT may be just the advantage you need to get away.

Zip ties are cheap and nearly impossible to break, making them a favorite for human restraints. If your hands are secured in front of you, here is what you need to know to release your binding.

CREATE SOME WIGGLE ROOM

When someone places a zip tie on your wrists, place your hands side by side, palms down, and ball your hands into fists. Flex your chest to enlarge the span of your shoulders. When the bad guys come by to tighten your restraints, they will see that they are snug. Later, when you relax, you should have enough room to release your bindings with a small shim.

A FLAW IN THE DESIGN
Zip ties have a small latch that wedges itself against the teeth on the strip that is pulled through the lock. When the strip is pulled backwards, the latch falls against the teeth and prevents it’s release. A small nail file, eyeglass screwdriver, razor blade, pin or other small object can be used to insert between the teeth and the latch to allow the plastic strip to be pulled out of the lock. If you’ve got enough slack in your bindings, you should be able to insert a shim and release your zip tie.


Here is a video that shows how to release a zip tie using the shim method


Re-use Your Zip/Cable Ties - The funniest movie is here. Find it


REMOVE THE TIE WHILE STILL LOCKED
This method also begins with creating wiggle room. Hold your wrists crossed with the thumbs facing upwards, rather than to the sides. This enlarges the circumference that will be needed to secure your hands. When the zip tie is tightened, move it up your arm by spreading your elbows wide. When you are not being watched, rotate your wrists so that your hands are palms together as if in prayer. Inch the zip tie forward on your hands with the goal of getting one thumb free. Pull one hand through and then the other will slip free easily.

This video demonstrates how remove your hands from a zip tie without unlocking it and how to use it to unlock a door. Not sure the zip tie had anything to do with the hair. :teef:


BREAK THE LOCK
The third method seems a bit counterintuitive. Place your hands together with palms facing and the fingers curled into a fist. Try to have the lock resting on top of your wrists where the two arms meet. Have the tie as tight as possible. Raise your hands to the face or chest level with elbows bent. Then, drive your arms down quickly, past your sides and try to make your shoulder blades touch. This will place force onto the lock that will cause it to snap and fail.

The following video demonstrates how to break a zip tie lock.


As always, this article is offered for information purposes only. The reader should exercise good judgment and assumes all liability when attempting to utilize these methods.
read more “HOW TO RELEASE A ZIP TIE”

Saturday, January 16, 2010

EARTHQUAKE SAFETY

Bookmark and Share
When the earth begins to move seconds are crucial. There isn’t time to panic AND survive. Choose to act and live. If you can feel a tremor, you are close enough to the epicenter (or blast) for there to be structural damage in your area. Depending on where you are located, the following guidelines may help save your life.

BASIC RULES
Keep a flashlight and sturdy shoes within reach of your bed and your work place. At home, keep clothing you can quickly put on within reach of your bed. If you are in bed when the shaking starts, remain in bed until the tremor is over. Once the shaking stops, put on your shoes and clothing. Broken glass will easily slice through bare feet (or casual/dress shoes) and hinder your efforts to get to safety.


DUCK * COVER * HOLD

IF YOU ARE INDOORS crouch near an interior, load bearing wall. Place yourself beneath a study object (table, etc.). Protect your head and neck with your hands. Brace yourself by hanging onto whatever you are beneath.

IF YOU ARE IN A TALL BUILDING duck under a sturdy object. Cover your head and neck with a hand. Hold onto whatever you are ducking underneath for stability. When exiting, always use the stairwells. NEVER use elevators during earthquake or fire.

IF YOUR ARE OUTDOORS
Observe where the large trees and power lines are located. These could be falling hazards. Avoid these or any other overhead hazards. Look for an open space where you can avoid falling debris. In the city you should avoid standing near high buildings. As much as 2 to 13 feet of glass could cover city streets below high rise buildings.

IF YOU ARE IN YOUR CAR
Stay in your car. Try to position yourself away from overhead hazards. Don’t park underneath an overhang. If you ARE stuck under a bridge in your car, remain in the car during a tremor. Tires will act as a cushioning (and insulation) if heavy debris fall onto your automobile. If you are on an open roadway, pull over to the side of the road (don’t block the road). Wait for the shaking to stop. Listen to your radio for reports & instructions.

AFTER THE SHAKING STOPS
Expect aftershocks; be prepared to repeat the DUCK, COVER & HOLD. Make sure you are okay. Get a flashlight. Flashlights are much safer than candles in the event of gas leaks. Account for everyone in the household (if at home). Get everyone out to safe place – pre-determined meeting place. Then, take a lap around the house to assess the damage to property – any large cracks, foundation movement, does the house look askew?

Don’t turn off natural gas until instructed by authorities. Listen to AM radio for updates/news from the Emergency Broadcast Network regarding where to go for help.

Don’t forget to locate your pets. Try to calm and re-assure them. Place them on a leash or restraint for several hours until you are SURE they are calm and not prone to running away. This can also help keep them from biting because of anxiety.

FOLLOW YOUR INSTINCTS
Use your best instincts regarding disaster safety. Observe the habits of nature around you. Did you know that on Monday, May 5th of 2008, frogs in China began a mass migration that took them across streets and roads? The following Monday, May 12th, central China was rocked by a 7.8-magnitude quake which killed nearly 10,000 people.


USE CAUTION
This article should be used as a guideline. Taking the time to think through your options BEFORE such an event will greatly help you should you ever find yourself in such a position. This information is not a substitute for professional services. The reader assumes all liability when utilizing these measures.
read more “EARTHQUAKE SAFETY”

Monday, January 4, 2010

HERBS AS INCENSE

Bookmark and Share
In the past, certain herbs such as sage and rosemary were burned to cleanse sick rooms. Cedar is a fragrant wood known to have antiviral, antifungal, expectorant, and lymphatic cleansing properties. Pine, Spruce and Fir needles contain shikimic acid, the main ingredient in Tamiflu, which is used to fight the bird flu. Frankincense is also a known to be very effective incense in the treatment of respiratory ailments. Mullein and Eucalyptus leaves are also beneficial herbs that can be used in this manner.

By slowly burning herbs, the essential oils are released into the smoke and carried into the lungs of those that inhale it. If a person is suffering from bronchial inflammation, the beneficial properties of the herb are applied directly to the inflamed tissue.

I know of one woman that had been dealing with such a strong cytokine response during a bout with the flu that she was choking, vomiting and struggling for air. Her husband closed the damper on their wood stove and tossed some Cedar into the fire, filling the house with smoke. Immediately, the cytokine storm stopped. Within 20 minutes, there was no mucus and she felt as though she hadn’t had the flu at all. They have repeated this remedy with the same result on other family members, airing the house afterwards.

American Indian tribes regularly used Cedar to smoke and cleanse their homes. In rustic conditions, smoke can be used to cleanse a person, clothing, bedding or shelter of vermin, molds, etc. Cedar smoke was one of the ways that priests were instructed to cleanse a house where there had been a plague (cf. end of chapter 14 of Leviticus).

HOW TO BURN HERBS AS INCENSE
Using tongs, place a hot coal or ember from a hard wood fire onto a heatproof dish. Place the herbs onto the hot coal and allow the herbs to smolder. Inhale the resulting smoke. The goal is to encourage the plant material to produce smoke, not to ignite into an open flame. This can be accomplished by only using hot coals (rather than fire) and/or by binding the plant material into a tight bundle.

Tightly bundled herbs are called smudge sticks. Some branches, twigs or leaves are supple enough to form into tight braids. Dried leaves can be secured with twine and unbleached paper. To use a smudge stick, hold one end of it to a flame until it ignites. Then the flame is gently blown out leaving the plant material to smolder and smoke. Smudge sticks are handy as it is easy to direct the smoke and they will tend to burn for a longer period of time.


CAUTION
Do not inhale the smoke of any herb or plant material to which you have known allergies. This article is for information purposes only. Readers that incorporate these methods do so at their own risk and should utilize safety precautions. None of this information is a substitute for professional health care.
read more “HERBS AS INCENSE”

Kay is . . .

a perpetual student of things I find interesting and (I hope) helpful to others. Feel free to use and apply all information with a healthy dose of common sense. :-)


Search By Category


References & FUN

CLICK THE COUPON 2 VISIT iHERB

iHerbButton

ADD KAY 2 UR LIST!

No Greater Joy!

NGJbutton