Kay's Picks

    ↓ WHY I USE iHerb ↓


    Wonderful Readers!

    NETWORK READERS

Monday, June 4, 2012

THE TRUTH ABOUT EXPECTATIONS OF PRIVACY ON THE INTERNET

Bookmark and Share
You may have noticed the following posted in the status line of many users of social media:

For those of you who do not understand the reasoning behind this posting, Facebook is now a publicly traded entity. Unless you state otherwise, anyone can infringe on your right to privacy once you post to this site. It is recommended that you and other members post a similar notice as this, or you may copy and paste this version. If you do not post such a statement once, then you are indirectly allowing public use of items such as your photos and the information contained in your status updates.

PRIVACY NOTICE: Warning - any person and/or institution and/or Agent and/or Agency of any governmental structure including but not limited to the United States Federal Government also using or monitoring/using this website or any of its associated websites, you do NOT have my permission to utilize any of my profile information nor any of the content contained herein including, but not limited to my photos, and/or the comments made about my photos or any other "picture" art posted on my profile.

You are hereby notified that you are strictly prohibited from disclosing, copying, distributing, disseminating, or taking any other action against me with regard to this profile and the contents herein. The foregoing prohibitions also apply to your employee , agent , student or any personnel under your direction or control.

The contents of this profile are private and legally privileged and confidential information, and the violation of my personal privacy is punishable by law. UCC 1-103 1-308 ALL RIGHTS RESERVED WITHOUT PREJUDICE.

The reality is that expectations of privacy by the user are outlined in the 'privacy policy,' 'terms of privacy,' 'legal terms,' and other such legal notices that you show you've read and agreed to when you establish a profile with various online sites. This includes Facebook, but also other sites. If you haven't already negotiated a modified agreement before signing up, you can only delete your account. Otherwise, any information you disclose while a member of that site is subject to the terms to which you've already agreed.

Posting a notice like that above will not protect your privacy or negate your contract. But protection from snooping by businesses and government entities is only half of the equation.

Anyone on your friends list could accidentally compromise your personal information by disclosing it. Often this is done without malice. However, once you've posted information, you have no control over how viewers of that information use it. An example of this may be a funny picture you post of your child. A friend likes your photo on his or her wall. A friend of that friend shares the image. In a flash, a personal family moment is being scrutinized by strangers.


If you'd like more information on internet privacy and security, read INTERNET SURVIVAL: PROTECTING YOUR PRIVACY.
read more “THE TRUTH ABOUT EXPECTATIONS OF PRIVACY ON THE INTERNET”

Sunday, June 3, 2012

EASY TO BUILD RAISED BED PLANTER

Bookmark and Share
Father's day is fast approaching. My dad is an avid farmer, but this season has been a tiring one for him. I figured it would be nice to give him a raised bed for his favorite plants (the ones he doesn't want the bunnies to have). I was inspired by Ana White's post here. (Be warned, if you follow her link, you will likely be lured into planning lots of fun projects.)
Any tool which helps a person produce all or a portion of his own food helps to increase his quality of life. A gardener with several seasons of experience becomes a valuable source of practical wisdom in his or her local community. Gardening allows you to set aside a portion for the winter months. It provides you an opportunity to share nourishing, nutrient dense foods with others.

Raised bed gardening requires an up-front investment in the initial preparation and planning stages. Afterwards, the beds become less labor intensive than traditional ground level gardening. Some of the benefits of raised bed gardening include:

* Allows easier access for gardeners to tend their plants.
* Extends the growing season as the elevated soil is warmer.
* Can be used by apartment dwellers (balconies & rooftops) and those with limited yard space.
* The containers hold the soil you choose. You don't have to settle for poor soil conditions.
* Protects garden soil from compaction.
* Provides adequate drainage.
* Permits more plants per square foot because walking space is outside of the planter.
* Creates a barrier that discourages animals from eating your plants.

There are some differences in my box and the one designed by Ana, but the basic construction elements are the same. (Click on any of the images for an enlarged version.) First, I made my box 3 boards high (cedar dog-eared fence pickets), using the full length of the pickets for the sides and 1/2 the length of the boards for the ends. I used a pull saw to remove the dog ears before construction. The fence pickets were on sale for $1.59 each. I purchased 10. I also purchased a 12-foot pressure treated pine plank that was 8 inches wide. This was cut in half and used to create benches on the sides of the planter. These can be used as seating or just a handy shelf for gardening tools while working around the plants. 1 x 2 pickets hold all three boards together on each side. I used segments of 2 x 4's to create braces to hold the benches. Also, I kept the upper level of the end boards longer than the bottom two, creating a support on which the ends of the bench boards could rest.

The entire box was assembled using wood screws. I also used corner brackets on the interior corners where each board met to give added stability. All boards were pre-painted with contrasting paint purchased from the $5 shelf. The next time you're in the home improvement store, check for cast-off cans of paint. These are colors that have been mixed and not purchased. They are offered for sale at DEEP discounts. I look for latex, indoor/outdoor base and top-coat all in one.

Tools used included a Irwin Dovetail Pull Saw, Black & Decker electric drill (with screwdriver and drill bit). The pull saw is my new favorite tool as it gives me smooth, sanded finish cuts without chewing or splintering my wood. My electric drill never loses power like battery operated models can. I've used it for MANY projects for almost 20 years. It's a power-horse of a tool. I needed some clamps and appreciated an extra pair of strong hands to hold things in place during assembly.
All in all, it was a relatively simple project.

The interior of the box is sized 17" deep 33" wide x 71" long. It will easily fit into the bed of a standard sized truck or the back of a family van (if it's the kind with rear seats that collapse).

This box has no bottom. We will lay poultry wire on the ground and set this on top before filling with topsoil. The wire will keep burrowing pests away from tender plant roots. The cedar planks are weather resistant, rot resistant and will help repel harmful insects.
read more “EASY TO BUILD RAISED BED PLANTER”

Thursday, July 14, 2011

4 STEPS TO SAFE DRINKING WATER

Bookmark and Share
Humans and animals must have water to survive. Securing a safe source of water takes time. Consider how to best invest your resources well ahead of a crisis point. When standard clean water sources are unavailable, here are some ways you can help secure safe drinking water.

1. SELECTION
Choose the cleanest water you can find. Look for a water supply that does not have any obvious debris floating in it. Check to be sure dead animals, sewage, or other bits of organic matter are not easily seen in your water source. Locate a source that hasn't been contaminated by chemical spills.

Some people believe that exposure to various water sources will give you immunity to disease-carrying microbes, making it possible for you to safely drink unfiltered water while traveling. The reality is that some microbes could wreak havoc with your health and cause severe physical damage. There is some truth that limited exposure can build immunity. It is also true that no one wants to become ill unnecessarily. Avoid chemically contaminated water sources as these hazards cannot always be filtered from the water. Don't take risks if you don't have to do so.

2. FILTRATION
Filter the water you collect. There are many ways that water can be contaminated. Not all contaminants are visible. Select a method of filtration to further insure the safety of your drinking water.

With water filtration, there are a range of options from bad to better and best. No single option is practical in every application. Everything from the temperature, sunlight, terrain, individual skill levels and materials on hand will play a role in the safety of the water you consume. Preparation and information is the key to keeping your water supply a source of health rather than a hazard.

3. DISINFECT
Disinfect the filtered water to kill any remaining disease carrying organisms. Once you’ve selected and filtered your water, you will want to heat it to the point of pasteurization. This is about 150 degrees Fahrenheit, several degrees below the boiling point.

Using pasteurization helps to avoid loss of water vapor by boiling. Pasteurization can be done using sunlight by leaving a sealed transparent container of water in direct sunshine from two to four hours. The time depends on the heat of the sun and the surface on which the container is resting.

Without a thermometer, it may be easier to heat the water to boiling to insure it’s disinfected. Use a lid or covered container to avoid loss due to steam. Distilling water by boiling and drinking the condensed steam is the safest way to consume clean water from questionable sources. Proper water distillation insures that the contaminants are left in the original vessel while only pure water moves to the catch vessel.

4. STORAGE
Use safe storage methods. Good drinking water can easily become contaminated by exposing it to a tainted container. If plastic containers have been used for toxic chemicals, it is possible that the plastic could release some of those chemicals back into your carefully cleaned water. Wash glass containers carefully before re-use. Take the time to cover containers to protect the contents from contamination.
read more “4 STEPS TO SAFE DRINKING WATER”

Tuesday, June 21, 2011

LEAN TIMES PREPARATION

Bookmark and Share
A shopping spree to purchase thousands of dollars in pre-packaged survival solutions may not be the best option for families that are already dealing with a tight budget. A better choice is to invest in tools and information. Granted, you could easily overspend here as well. However, getting a good back to basics education and accumulating tools can be done frugally if you are wise in your selections.

Tools are one thing that you can invest in and begin to use now. You wouldn't want to purchase a needed tool and simply store it. For a tool to be useful, it must be used skillfully. Select tools that can be used in everyday situations and become familiar with them. Borrowing and renting tools can give you some hands-on experience and help you narrow the field to those you find best suit your needs. Look for a tool that can be utilized for more than one purpose. A single-purpose tool can take up too much space or resources required for maintenance relative to its usefulness.

Whether you are deciding on a tool for heat, shelter, food or clothing, ask yourself if the tool can be used for at least 3 tasks. If not, this may not be a good investment. Take the time to look at your expenditures as investments. What will be the the return down the road? An example of this may be that learning to tend plants and animals today will feed you tomorrow and make you familiar with the ways you can enrich your environment. Taking the time to learn how to sharpen and maintain a tool today will make you familiar with skills that will make it easier to maintain and repair other tools in the future.

Regarding food preparation, look for tools that are simple and help reduce the expenditure of time and energy. An example of this may be a grain mill. This can be a hefty investment, however it pays for itself by allowing you to make an assortment of breads and pastas for a minimal expense. Knowing how to process a grain into food gives you more options when traveling or trying to make ends meet in lean times. Having whole grain on hand allows you the option of sprouting, grinding, or cultivating the seed. A bag of milled flour cannot offer you this.

Convenience foods do save time. Take that time to learn some basic chemistry and become familiar with how ingredients can be blended to create certain flavors. Using various spices, and herbal blends allows you to add nutrients and taste to otherwise bland foods. Becoming familiar with the actual foods that go into a finished dish gives you valuable experience and confidence when preparing whole foods. During food shortages, those who understand these things are better able to create filling and nourishing meals with what little is on hand.

In lean times, knowing how to use available resources and having the skills required to prepare food from basic ingredients will serve you and your family well.
read more “LEAN TIMES PREPARATION”

Saturday, May 21, 2011

USEFUL TRAVEL CLOTHING QUALITIES

Bookmark and Share
Survival scenarios rarely arrive with prior notice. Most people will be improvising and dealing with materials on hand. However, there are some circumstances that arrive with advanced notice allowing you the opportunity to select carefully what items you pack. Selecting the right garments can give you a great advantage in your ability to regulate your body temperature, protect yourself from the elements, or avoid standing out in a crowd. When selecting what to take, consider carefully your fabric choices.

It’s impossible to state with certainty which fabrics will work best in every climate and every situation. However, research reveals some qualities that are consistently desirable.

NEUTRAL COLORS
The clothing you pack needs to be versatile enough to wear well in a variety of locations. Neutral colors coordinate well with each other, allowing you to pack fewer items which can be mixed and matched. Brown, black and khaki colors work especially well for pants, shorts and skirts. If you are traveling to a warm location avoid dark colors for your outerwear as these colors can make you uncomfortably hot.

COMFORT
It would seem that other considerations would have greater importance. Comfort is key however when selecting garments which give you greatest mobility. Look for clothing that feels good against your skin allowing for ease of movement. What may be a pinch or an itch now could turn into a blister later. Listen to your body and ignore the mirror when testing garments for comfort.

QUICK DRYING
Again and again the importance of having quick drying material is recommended by experts. Fabrics that can be washed and dried completely are given high ratings for desirability. This quality prevents trace amounts of moisture from being trapped in seams where bacteria can grow. This is of great importance when trying to avoid fungal infections on your skin and avoiding mold growth in your pack.

LIGHT WEIGHT
Another point on which experts agree is that garments should be very light weight. For comfort in cooler temperatures, layering ls recommended so that the body temperature could be regulated by removing or adding layers. Making sure that layers are not heavy means you will use less energy carrying those items. Remember that bulky items can often weigh less than more compact ones.

MOISTURE WICKING AND BREATHABILITY
Clothing should be made of materials that breathe well and wick moisture away from your skin. This serves a dual purpose. Moving moisture away from the skin means that you will more easily regulate your core body temperature. Additionally it means that your skin isn’t as susceptible to opportunistic inflammation and blisters that occur when friction is applied to wet skin.

WRINKLE FREE
This isn’t necessarily an essential quality. However, if you are traveling light, it often means that you will be packing garments into a small space. Knowing that you can arrive at your destination and not have tell-tale creases running through your clothing is an added bonus, especially if you are trying to be inconspicuous and not draw attention to yourself. This particular feature, however, is a subjective quality and not one that should be given highest priority. Many times, hanging a freshly washed garment to dry will eliminate most wrinkles. Another hint is to select garments that are made of fabrics with a pattern which will mask wrinkles.

When preparing an emergency pack or a bug out bag, take these qualities into consideration. You’ll be glad to have clothing on hand that will travel well and hold up under a variety of conditions.


The following 5 minute video -- Selecting Clothes to Pack -- discusses many of these considerations when packing.

read more “USEFUL TRAVEL CLOTHING QUALITIES”

Thursday, May 5, 2011

BACK PAIN SURVIVAL GUIDE

Bookmark and Share
When your back muscles are spasming in pain, it's difficult to think. The pain can become so severe, that it leaves you nauseous. In some cases, the event can go on for days, leaving a sufferer feeling as though he is recovering from a bad case of the flu.

These are my best recommendations for stopping back pain in its tracks.

FIRST
Don't ignore your pain! As soon as you start hurting, acknowledge that something is wrong and take steps to remedy the situation. Ignoring a painful back, or trying to 'work through the pain,' can lead to further injury and greater pain. This leads to more down time which will keep you away from the things you most enjoy doing or tasks that require your attention.

Use alternating cold and hot water. This gives immediate relief. Use your shower and work on it for at least 15 minutes, starting with cold and ending with cold. The longer you can keep this up, the better. This settles things down right away.

This article offers a more detailed description of this method: Remedy for Inflammatory Pain
This article explains why cold and hot applications help relieve pain: Treatment for Swollen Feet and Hands

NEXT
Keep hydrated! Drink lots of WATER! Water helps flush your system of toxins that have accumulated in your painful muscles and joints. It's easy to forget to drink when you are hurting. You may even avoihttp://www.blogger.com/img/blank.gifd fluids thinking that it's so painful to move, you don't want a full bladder with which to contend. However, water is your friend in the journey to stop an aching back. Dehydration can even make the pain worse by leading to constipation, which can actually cause additional back pain. To determine how much water you should be drinking, read this post: Healthy Hydration -- How Much Water Should You Drink?

Add ginger to your water. Drinking ginger tea can help ease the pain. If you can't find this, a well made ginger ale can help. Ginger root helps reduce spasms and pain. Read more about ginger's properties here.
Benefits of Ginger Root

FOLLOW THROUGH
After you've reduced the pain, use a cabbage leaf wrap overnight. Seriously, put a cabbage leaf on the area and go to bed. I know it sounds strange, but you'll be amazed by how well it works. One man could barely walk with knee pain before he was willing to give this a try. His tired stiff knee felt like new after being wrapped in cabbage. Here's an article on how to use cabbage leaves: Cabbage Leaves Relieve Pain and Swelling

An additional thing you can do that can really help relieve the pain is to take a good quality cod liver oil. We like to purchase Nature's Answer, Liquid Norwegian Cod Liver Oil, Natural Lemon-Lime Flavor from iHerb as my husband doesn't care for those that taste of fish. Fish oil is a natural anti-inflammatory. Read your labels and use care in your selection. When hurting, we simply take a couple of tablespoons and repeat every 2 hours or so until the pain subsides. This works well for other inflammatory conditions as well, including things like mild allergic reactions.

DISCLAIMER: As always, use your own judgment and common sense when applying these remedies. These are methods that have worked in my own home and for others. This article presents ideas and information designed to enrich the reader. This is not offered in lieu of sound medical advice. The opinions and ideas expressed are fallible and that of the author. Readers are encouraged to be well-informed and draw their own conclusions.
read more “BACK PAIN SURVIVAL GUIDE”

Thursday, April 28, 2011

REASONS TO USE A SMALL PACK

Bookmark and Share
Articles and books on survival regularly offer lists of items should be packed for emergency travel. The overwhelming majority recommend that you pack light. There are good reasons for having few items to carry when you are on the move.

You will have to keep your pack secure. This is more difficult to do if you are encumbered with a large bag. It’s good to be strong enough to heft a good bit of weight, but if your strength is used to carry your pack, you won’t have much left to protect yourself or keep track of your possessions. Additionally, a large, heavy pack is a signal to others that you are on the move. It makes you less anonymous. This can create some difficulties.

A large pack will make it difficult for you to maneuver into and out of tight spaces. If you need to catch a ride or take public transportation, you’ll need extra space for your bag. Not every Good Samaritan has a large vehicle. You’ll not be able to take advantage of two-wheeled conveyances. A smaller pack enables you to avoid storing it in a trunk or a locker. Buses will require you to place a large pack on the roof or in the cargo compartment where you can’t keep an eye on it. You can keep a small bag on your lap and avoid extra fees for a seat to hold an oversized backpack.

If you need something out of a large pack, you may find yourself having to unpack and repack it to get the desired item. The larger your pack, the more cumbersome this process becomes. This can be dangerous if you are trying to get to your medical kit. It’s just a lot easier to have to rearrange fewer and lighter items.

A smaller pack gives you the freedom and flexibility to decide which route is best for you rather than which route you can manage with your large bag. Moderate terrain can become impassable if you must manage it with a heavy pack. Any terrain is easier to traverse with a lighter pack. Rather than use up strength and stamina carrying unnecessary weight, use it to choose the journey rather than let your pack determine your route.

Take the time to notice people outdoors who are moving with freedom. The ones that participate in the most activities have the lightest and smallest packs. Learn how to make use of multiple use items as a way to lighten your load. Information weighs nothing, and it can make a vast difference in the tools you will be able to utilize.


Sean with Silver Fox Bushcraft takes the time in this clip to show what he carries in his pack for hiking and woodland exploration.


David Wendell with Bushcraft on Fire shows how you can create your own kit without a retailed pack.

read more “REASONS TO USE A SMALL PACK”

Thursday, April 7, 2011

INTERNET SURVIVAL: PROTECTING YOUR PRIVACY

Bookmark and Share
Privacy is something that you don't realize you need until you've lost it. Here are some ways to maintain your privacy and relative safety on the internet.

You may be sharing more than just a few cute photos when you post an image on the internet. GPS enabled phones can capture images that can accurately reveal your location. All it takes is a few right clicks of a mouse for someone to copy the coordinates, paste them into Google maps and then map the shortest route to view that loved one or prized possession in person. With social network status lines, you could be revealing your CURRENT location and inviting untold numbers of strangers to join you. It’s important to be aware of this even when well-meaning family members are taking pictures of your children.

This video shows you how to disable the GPS tag on your phone photos.


This video covers some of the other dangers to revealing your location to strangers.


It is best if you don’t make public your full legal name, street address, date of birth, telephone number, or Social Security number.

If asked for your name, use initials. Scramble the letters of your name, use nicknames etc. This precaution will also give you a head's-up if you receive spam. If someone addresses you by anything other than your actual name, you will know that this is not someone you know personally.

Never make your street address public. If it is required, offer only what is necessary. Some sites only require a state or region. Adjust your security settings to keep this information private. Only make online purchases from trusted vendors as you will have to give them your address for shipping purposes.

Keep your birth date private. Sites that require your birth date often do so in order to insure you are an adult. If their security is breached, this is a key piece of personal information that someone could use to guess your social security number. Check your security settings and be sure this information is private. Consider using an online birth date that includes your birth year and an alternative month and date. Or you could use your actual month and date with the year previous or following your actual birth year. This will give the host an accurate gauge of your age without opening you up to unnecessary snooping.

Don’t reveal your home telephone number. Refrain from offering this and keep security settings private if it is included in an online profile. If someone discovers your telephone number and knows your full name and birth date, it is possible for them to use these items to add unauthorized charges to your bill.

Your social security number shouldn’t be given out unless it is absolutely necessary and to a verified financial or medical institution that you called. Always ask if you can offer an alternative number. Decline to give your number to someone that calls you.

Protect portable electronic devices with passwords. Use upper and lower case letters, numbers, and symbols. Don’t tell your device to remember your user name and password. Don’t store financial information on portable devices. Always log off when you’re finished. If your laptop or phone is lost, it’s harder for someone to access your personal information or clean out your accounts.

Internet safety is basically taking the time to cultivate good habits. Posting something on the internet is just like putting something on a very public bulletin board. The time you take now to develop these habits will protect you and your family later.

Bonus tool for readers with children:
Here’s one of my favorite tools for school aged children that want to do internet research. Make Quintura for Kids the home page on your internet browser. This search engine filters out undesirable "adult" content and reviews approved sites regularly. We’ve used it successfully at our house and recommend it to other households with children. It provides a safe way for kids to do searches without awful content and images surprising them. Try Quintura for Kids out for yourself at quinturakids.com.

Note: Quintura won’t prevent users from going to inappropriate internet addresses that they know how to get to. You’ll need another type of filtering service for that application. Check out this article for some additional suggestions for user accountability helps.
read more “INTERNET SURVIVAL: PROTECTING YOUR PRIVACY”

Friday, April 1, 2011

THE PRICE OF PARALYZING FEAR

Bookmark and Share
Strong emotions in charged circumstances bring about visceral responses that are not planned or calculated. These strong emotions are dominant and can cancel out intellectual responses. This is true whether you are dealing with a child delighted with a long-desired gift, a young lady surprised with a marriage proposal, an athlete celebrating a victory, or a person who finds himself in need of rescue.

An experienced teacher will tell you that all learning stops the moment a student becomes overly emotional. A distraught person can’t be expected to make considered logical choices. Whether someone is dancing in delight, or wailing in dismay, unchecked emotions make it impossible for that person to respond in a calculated, intellectual way.

I’ve recently viewed footage of people who have had their cars towed to an impound lot. These individuals must navigate a confusing maze of legal and financial requirements before taking possession of their vehicle. The circumstances are varied, but one thing is common: these people are under stress.

For those who are able to calm themselves, setting aside feelings of victimization and anger, the results are fairly straightforward. They determine what is required for the release of the vehicle, go about getting their affairs and documents in order, and then return to claim their car.

For those unable to calm themselves, the process becomes more tedious and lengthy. They direct their frustration at the workers in the office. Aggressive body language, raised voices and accusations fly back and forth as workers try to tell the car owner what he or she will need. Often, the person only hears one or two instructions before emotionally shutting down. They leave and return several times as they collect one or two of the documents they need each time. The stress level of the worker starts to rise as he or she responds to the upset customer. This leads to mistakes and omitted information on the worker’s part.

Fear impairs mental function in the form of confusion, forgetfulness, and the inability to concentrate. In this state, a person can be numbed by shock, begin to panic, or lash out in anger. When seconds count, a fearful person may cause others in his party to lose their life. It may be necessary to leave him behind for the sake of the group’s safety.

I find that the most recommendations for survival safety focus on two concepts: faith and preparation. The more important of the two is faith. Why? In survival circumstances, the truth you know about God and about man will have a powerful impact on your behavior. A person of faith won’t waste as much time second-guessing and railing against the circumstances.

Faith is the opposite of fear. Faith moves us towards life. Faith reminds us of the One in whom our trust is placed. Faith tells us that we are not alone.

Once your fear response calms, your preparation will kick in. If you’ve practiced thinking on your feet, making decisions on the fly, and dealing with various terrains, you will find yourself well-served by your time invested in these pursuits. However, if you are not able reign in your emotions, all of that preparation may likely do you no good.

I found an account of an interview of survivors of the 2004 Indonesian tsunami. The reporter stated that it occurred to her that everyone sitting in that room lived because they ran to the mountains. Those that did not move immediately died. It reminded me of the scripture that reads, “And let him that is on the housetop not go down into the house, neither enter therein, to take any thing out of his house: And let him that is in the field not turn back again for to take up his garment” (Mark 13:15,16).

Fear used properly can be a lifesaver. As a master, fear can kill. Learn truth. Build your faith and be prepared. When circumstances seem dire, these steps will equip you to respond.
read more “THE PRICE OF PARALYZING FEAR”

Friday, February 25, 2011

DEBI PEARL'S 2ND BOOK ON CHILD SAFETY: SARAH SUE LEARNS TO YELL AND TELL

Bookmark and Share
A children's book about how to stay safe from predators isn't the first choice on most parent's shopping list. We want our children to remain innocent and not live in fear. Isn't part of protecting them shielding them from information about predators?

At first, it sounds reasonable to avoid unpleasant topics with our children. Then I recall how we learned fun rhymes and songs to reinforce safety lessons when I was a child. I can remember being taught how to cross a street LONG before I was ever allowed to cross by myself. Someone decided that knowing how to stop, drop and roll if my clothing caught fire was vital to my well-being . . . . just in case. We weren't allowed to play with matches, but a big talking bear reminded us that only WE could prevent forest fires. We didn't even live near a forest!


That's why I'm so glad to see a children's book that does this same thing. SARA SUE LEARNS TO YELL AND TELL promotes a positive message to children that there are things they can do to stay safe. Without being graphic or going into lurid details, this book encourages children that are approached to immediately alert someone. Debi Pearl's latest children's book gives little ones confidence that God is on their side and there IS something they can do. It's comforting to tell children that there IS a way to respond and they CAN tell someone who will listen.

SARA SUE LEARNS TO YELL AND TELL is a book that reinforces safety for children growing up in today's world. Decades ago, the dangers were different. Today, human trafficking and child predators are common. These hunters hide in plain sight, and they know how to target vulnerable children.

Debi's book helps me remind my children of the ways they can avoid looking like an easy target. Reading SARA SUE with them opens up a dialogue so that they know it's safe to come to me and talk about these issues. The rhyming verse and colorful images are both appealing and entertaining for children. The helps in the back of the book are an encouragement to parents that we needn't be afraid, just prepared.

I'm very grateful that this grandmother took the time to not just teach these lessons to her own family, but that she has reached out to help keep other children safe as well.


Click the button to order:


SARA SUE LEARNS TO YELL AND TELL can be a lifeline to children that don't know how to respond to threats. Senator Scott Brown describes what happened to him as a child.

read more “DEBI PEARL'S 2ND BOOK ON CHILD SAFETY: SARAH SUE LEARNS TO YELL AND TELL”

Tuesday, January 11, 2011

DEBRIS HUT BASICS

Bookmark and Share
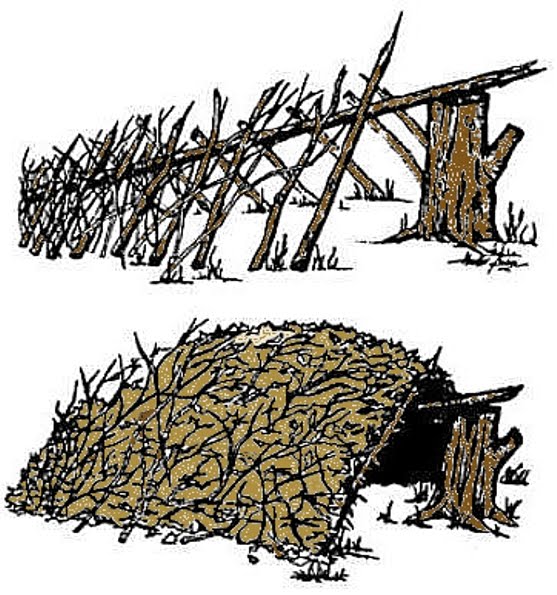
A debris hut is a structure constructed of found materials that can include leaf matter, branches, grasses and even snow. The insulated walls shield a person from cold and weather, serving as a combination sleeping bag and shelter. Using natural resources, a debris hut can be assembled in nearly any location. These can be used as an emergency shelter or a temporary shelter while you work to secure a more permanent structure.

While advanced skills are not required, experience and a good work ethic can be invaluable. A good training exercise is to construct a model from small sticks to get a good idea of what will be required for a full scale shelter. Another good idea is to build a full sized model using a time limit. In a survival situation, you may be limited by how much daylight is left in your day. Having a time limit will help you prioritize and work efficiently. Spending the night in your creation will quickly tell you which elements were lacking such as location, size, insulation, waterproofing, door construction, or bedding.

When deciding where to locate your debris hut, it is best to select an area that is a safe distance away from water sources. These could flood or dampen your shelter. Check the wind direction and position the entrance away from the prevailing wind. An open area that receives optimum sunlight surrounded by a stand of trees acting as a wind break is ideal. Keep the entrance small to help retain heat. A small fire at the entrance of your shelter will help keep you dry and warm.

When constructing a debris hut, smaller is better. This saves on construction time, materials needed and the smaller space is easier for you to warm with only body heat. Make it large enough for you to wiggle into feet first. To size the structure, lie on the ground and mark the outline of your body.

It is good to gather more material than you think you will need as the walls should be as thick as your arm’s length. Straight tree branches with leaves removed can be pounded into the ground to form your basic frame. A common method is to construct an A-frame for the entrance. This can be lashed together to form a support for the ridge pole and additional branches can be propped against the ridge pole to form the ribbing of the frame. On top of this, the debris is piled and woven to insulate and waterproof the shelter. If you have some thick plastic sheeting, use it to help waterproof your hut.

Every survival circumstance has unpredictable variables. Within these variables the human body needs to be protected from a loss of warmth that can lead to death. Knowing how to make a debris hut can truly be a lifesaver. Make a game of it and see what sort of structure you are able to construct from the things you find in your own backyard. Take the time to visit a wilderness area near your home and practice working as a group to build a structure. Once you’ve slept in your creation, you will know if there are things that need to be reworked. These fun activities can give you invaluable experience in the event of an emergency.


Dave Canterbury demonstrates how to construct a type of debris hut called a spider shelter in this short video.


The Wendell family demonstrates how a woman was able to construct her own debris shelter and overnight comfortably with her children in the structure.


read more “DEBRIS HUT BASICS”

Thursday, December 9, 2010

GUIDELINES FOR VOLCANO SAFETY

Bookmark and Share
It is best for people that live near a volcano to make plans for an eruption. Learn the alert levels issued by your local emergency management office and know what they mean. Listen for emergency updates and instructions, making note of information about hazards you may encounter. Prepare for a possible evacuation. Make additional preparations to shelter in place.

A volcanic eruption can alter the landscape in ways that are difficult to imagine. Near the site, there can be loss of life, and destruction of structures and property. The resulting ash cloud can cause airports to shut down and turn daylight to darkness. Earthquakes, flash floods, wildfires, thunderstorms and tsunamis can all occur as the result of a volcanic eruption.

Memorize the recommended evacuation routes. Maps marked with this route should be kept in each car and another in your home. Select maps with detailed geographical markings of the area surrounding your location. In the United States, hazard zone maps can be secured from the U.S. Geological Survey that will show probable lava flow paths and give time estimates on travel to certain locations along with their relative safety.

Prepare a getaway kit. Include safety goggles and dust masks or bandannas to protect your eyes and lungs from falling ash. Include long sleeved shirts, long pants and sturdy footwear. Keep a well-stocked first aid kit, blankets and warm clothing in a convenient location. With this, keep a battery-powered radio and fresh batteries so that you can still monitor alerts if your power goes out.

Unless you need to evacuate, stay indoors. Bring pets inside and move livestock into shelters. Close all vents, doors and windows for protection from ash and burning cinders. Put damp towels under doorways. Cover downspouts, machinery, electronic devices and computers to protect them from ash that can disable and clog machinery and pipes.

Listen for creaking noises from your roof. Ash will fall silently and can cause the roof to collapse under its weight. Remember to wear a mask and goggles if you go outside to clear ash off of the roof and gutters. Remove your clothing before re-entering the house rather than bring ash inside where it can irritate the airways of everyone indoors.

Keep at least three days worth of water and food in your home. An eruption can contaminate water supplies and you may have to rely upon what you have stored. If you hear that an eruption is imminent, fill all sinks, tubs and containers with water. Rely upon your stored water until your regular source is deemed safe.

If you must drive, use your headlights, proceed slowly at about 35 mph and watch your gauges for signs of an overheating engine. Ash can clog your radiator and other moving parts of an engine. Ash will also make roads slippery. When parked, cover your vehicle with a tarp and place it under a shelter to protect it from the falling ash.

If you must evacuate, turn electricity and gas off at the mains before you leave. Head for higher ground and try to stay upwind so that ash and gases are blown away from you. Volcanoes’ greatest dangers (lava flows, mudflows, poison gases and flooding) all move towards low-lying areas. An elevated area gives you greater protection than any attempt to outdistance the danger.

Afterwards, don’t return home until authorities say it’s safe to re-enter the area. Seek medical treatment for any injuries. The wait for medical treatment will be shorter for those farther away from the disaster site. When cleaning up property after an eruption, dampen the ash before sweeping or shoveling the buildup. This keeps the slippery substance from getting tossed back into the air.

Remember, in the event of an eruption, you may have only moments to react. Being prepared to move quickly and decisively can mean the difference between life and death.


This 4 minute video shows the extent of the destruction
caused by the eruption of Mount St. Helens.


This 17 second video shows Mount St. Helens
erupting in slow motion.

The entire side of the mountain slides to one side.

read more “GUIDELINES FOR VOLCANO SAFETY”

Tuesday, November 23, 2010

DANGERS DURING A VOLCANO

Bookmark and Share
A volcano is a mountain that opens downward to a reservoir of molten rock. When pressure from gases and melted rock becomes strong enough, the mountain erupts in an explosion that spews gases and rocks through the opening. Volcanic blasts can devastate miles of landscape within hours or minutes. Here are some of the things to watch for during a volcanic eruption.

An ASH CLOUD can turn day to night and prevent you from being able to recognize landmarks, coating everything it touches with a dark powder. It is made up of bits of glass and exploded rocks made under extreme temperatures. This corrosive substance does not dissolve and can damage mucus membranes, irritating skin and eyes. Infants and those with breathing problems are most at risk of injury from this. Cover your eyes, nose and mouth.

FALLING ROCKS (pyroclastics) can land miles away from the volcano. Place a ridge line between yourself and the volcano or hold something (backpack, box, trash can lid, your arms etc.) over your head for protection.

FIRES occur wherever burning debris lands onto tinder, spreading quickly.

FLOODING & MUDSLIDES kill more people than the initial blast. Even miles away, these are a danger as normal waterways are clogged or changed by the lava flow, ash and debris.

HEAT is also released with temperatures high enough to burn human flesh. Move away from the blast area to avoid this.

LAVA FLOWS are super-heated molten liquid. Nothing can stop them. Don’t attempt to cross them even if they appear cooled. This could be a thin crust that will give away under your weight. Never try to cross hot spots, mud holes or geysers as the ground surrounding them can be too thin to keep you out of the molten lava below.

POISON GAS and volcanic smog (vog) is the result of sulfur dioxide and other pollutants reacting with oxygen, moisture and sunlight. It can cause lung damage, breathing difficulties, headaches and death. Use a respirator, mask or moist cloth and get away from the area as quickly as possible. DON’T KNEEL OR CRAWL!!! The most dangerous gases often accumulate near the ground.

STRONG WINDS follow an eruption and can be felt miles away from the blast, knocking over trees and structures.

If you live in the vicinity of a volcano, NOW is the time to develop a plan to deal with events in case of an eruption.


Many Indonesians died in the aftermath
of Mount Merapi's eruptions
during October & November 2010.


read more “DANGERS DURING A VOLCANO”

Wednesday, November 10, 2010

DVD REVIEW: "NAKED INTO THE WILDERNESS"

Bookmark and Share
Readers may be interested in seeing an example of how rustic skills can serve you. NAKED INTO THE WILDERNESS gives a good overview of how this is possible. It’s one thing to know how to start a fire or build a shelter, it’s quite another to know how to have a shelter, fire and food without ready-made tools. There’s another level of skill required to know how to utilize the strengths of each individual within a group, take advantage of found materials and manage the variables that weather and terrain can toss your way.

NAKED INTO THE WILDERNESS is a video that demonstrates how primitive skills can be applied in their context. To emphasize the value of each technique, the participants venture into a remote location without iron tools or containers.

Part one takes you into the Kansas woods as you observe skills in several categories. Watch as the individual participants form into a cohesive group, securing food, shelter and the tools they need to accomplish each task.

While stone tools make for a slower work pace, you'll see that a LOT can be accomplished with very few basic materials. Watching this gave me a real appreciation for some skills that modern culture seems to have left behind including:
● basket making
● pottery
● fire-starting
● cooking over an open fire,
● stone knapping to make knives, axes and arrowheads
● cordage
● shelter construction
● foraging
● trapping
● and more

The second part of the video shows another group camp that utilized modern bedrolls and pre-made primitive gear. This footage has some scenes that show how "down time" is used by members of the group to make improvements to the camp. Additionally, there are scenes that show some lighthearted moments. Day 4 contains some silliness as a couple of the guys decide to try swimming in frigid waters. If you'd prefer to pass on some back nudity, skip that section.

The DVD is divided into topical chapter headings so that you will be able to review applicable sections. If you are practicing individual skills, it helps to see them demonstrated in a real life setting -- although this is not a detailed instructional video. You'll also get a pretty good idea of how to prioritize tasks and divide the labor among individuals. NAKED INTO THE WILDERNESS leaves you with an appreciation for how a small tribe or community with few materials and some knowledge can greatly enhance the life of all its members when they are willing to work together.

This is a valuable addition to your library and will work well as a gift if you are interested in these skills for personal use or for demonstration purposes. The production value is not up to the polished standards of a professionally produced work. This is not a video on how to be rescued when lost. Rather, you’ll be invited to enjoy the home movies of experts in primitive skills and gain from their insights. In spite of surface noise distractions, dead air and the occasional “is that thing on?”, there’s a lot to glean from this footage. NAKED INTO THE WILDERNESS takes you from theory to implementation of skills you’ll need to survive in primitive conditions.


Available at Bulk Herb Store.
Click on the image to order.

read more “DVD REVIEW: "NAKED INTO THE WILDERNESS"”

Saturday, October 23, 2010

FASHION SAFETY FOR WOMEN TRAVELERS

Bookmark and Share
A woman’s travelling attire affects her safety and her social interactions. When a woman presents herself in a way that suggests she isn’t carrying valuables and won’t easily be subdued, she can reduce the chances that she will be accosted. It is worth your time and effort to avoid looking like someone that might invite unwelcomed advances.

NO FLASHY JEWELRY
Wearing expensive jewelry when traveling can make you an attractive target. You could be injured if a thief were to grab a chain from your wrist or neck. A diamond ring may attract unwanted attention. If you MUST wear jewelry, choose something pretty that clearly has no value and turn your ring so that only the band shows.

FOOTWEAR
Choose comfortable, flat shoes that make it easy for you to run. You need shoes that protect your feet and allow you to move quickly. Select comfort and practicality over looks.

RESPECT FOR LOCAL SENSIBILITIES
Be aware of local customs when you travel. You are a guest where ever you go. Dress like one. The locals have had generations to develop a way of dressing that suits the climate and the culture. Learn from their example. Find out what is appropriate apparel for the places you are visiting.

Be modest, casual and comfortable. Consider how you might appear to a predator. Women wearing tight clothing, revealing tops and shorts can invite scrutiny from undesirable characters, lewd comments and attempts to look down shirts. Scantily clad women can also be offensive to residents. When it comes to safety, how you look is more important than your intent.

COVER UP
It isn't necessary for a female traveler to cover her head in most places, but there are places where having a covered head means you will get help easier should you need it. When in doubt cover your head. Lay aside opinions about appropriate dress and carry a bandana, scarf or crushable hat. A willingness to cover can convey respect, prevent prying eyes, and help avoid unwanted attention.

In some communities, bare arms and legs are only acceptable during swimming. A lightweight long-sleeved shirt, jacket or sweater can be wrapped around your waist. It will be available for sun protection or warmth and is easily removed when not needed. If you find yourself in a place where bare arms aren’t permitted, you’ll have a quick and easy slip-on solution.

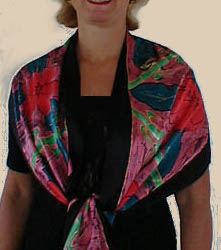
A scarf shows its versatility in this regard. A scarf can be used as a head covering, a shawl or a shrug. If it’s long enough, it can cover your shoulders and your head. A silk scarf can even double as a cover for your motel pillow. In a pinch, it can be folded and used as a sack to carry items.

THINK BEFORE YOU GO
Dressing for safe travel won’t cost you a lot of money, but the time you invest in selecting your garments carefully can be priceless. Instead of drawing unwanted attention, remember that it’s more important to your loved ones that you arrive safely.


In the following clips, Kirsten and Liz discuss how women can dress for safety when traveling. Bulk Herb Store’s Shoshanna demonstrates many ways to accessorize with a scarf.


read more “FASHION SAFETY FOR WOMEN TRAVELERS”

Thursday, September 30, 2010

FIVE POINTS FOR PERSONAL SAFETY

Bookmark and Share
Personal safety has a lot to do with not taking unnecessary risks. While there’s no guarantee that you will never be in an emergency situation, you can take steps to discourage attackers and make rescue more likely. This is an abbreviated list of some things you can do to stay a little safer as you move from place to place.

PREPARATION
• Leave written details of your travel plans with two trusted friends who will notify searchers if you deviate from your itinerary.
• Carry a noisemaker like an electronic device, personal alarm or a whistle. If you have one, use the car alarm button on your key chain.
• Carry a heavy duty flashlight, pepper spray, or even a walking stick. Check laws in your area. In the event of an attack, be prepared to use your choice of device or it could be used against you.

POCKETS
• Avoid carrying a purse or wallet. These are targeted by thieves.
• Use several front pockets for valuables to avoid total loss if robbed.
• Keep emergency money in unexpected places such as shoes, bra, money belt, etc.
• Carry purse or backpack on arm opposite the roadway to make it more difficult for a motorist or bike rider to grab.

PEOPLE
• Walk with confidence keeping your head up, eyes at nose level, alert and with purpose. Attackers look for easy, fearful targets.
• Don’t engage in conflicts that can escalate into physical contact. Criminals sometimes work in packs and try to manipulate someone with a quick temper into striking first. Later, they claim that their assault on your person was self-defense. When you have the option, walk away rather than fight.
Don’t travel alone. Have at least one other person for a walking partner.
• Treat people with respect. Arrogant strutting alienates people that could help you.
• Be willing to learn. Ask questions, seek advice from locals.
• Express gratitude. Say thank you.
• Don’t wear expensive clothing and jewelry unless necessary.
• Avoid drawing attention to breasts, belly or thighs by wearing garments that expose them. Wise clothing choices keep you from being overly attractive to predators and give you freedom to access more locations that may have a dress code. Collared shirts (not sleeveless) and long pants are a good choice for men.

PLACES
• Be aware of your surroundings. Dark lonely places are best avoided. Stay in well lit, populated areas. This is a safer route, even if it takes a bit longer.
• If you see criminal activity occurring, leave the area. Some authorities arrest everyone and ask questions later.
• Public transportation and crowded areas require heightened awareness. These places allow people to jostle and bump into you – perfect opportunities for a thief.
Don’t tune out. Wearing a headset cuts you off from your surroundings, making it easy for an attacker to sneak up on you. When walking alone, don’t listen to electronic devices.

PROTECTION
• Learn some simple, easily performed defense tactics. You don't need to know how to beat an attacker, only how to buy yourself enough time to get away.
• MAKE NOISE if assaulted. Attackers hate attention-making noise. Don't underestimate the power of one person who may come to your aid if they hear you.
Practice yelling at top volume. Tell what is happening, give lots of details and describe your attacker while yelling “Call 911!” Repeat these as often as possible as a command. Witnesses don’t always know what to do and are more likely to respond to instructions than to pleas for help. Your assailants may be so stunned to hear you describe them that they run away.


These short videos below feature Captain Steve Pearl
who elaborates on more safety measures that anyone can employ.


read more “FIVE POINTS FOR PERSONAL SAFETY”

Sunday, September 5, 2010

MAGNESIUM FIRE STARTER STICKS

Bookmark and Share
Magnesium fire starter sticks can help you get a fire going, even in wet conditions. The shavings burn hotter than 1,000°F. This tool is small enough to be kept on a key chain and weighs less than 2 ounces. Similar motor skills as those required to strike a match are all that the user will need to get a spark. Magnesium fire starters respond well to a light touch and finesse rather than blunt force. If the first effort fails, enough magnesium remains on the stick for a few hundred more tries. For these reasons, I think it is an ideal tool for women and children as well as men.

There are three basic components to a magnesium fire starter stick: magnesium, flint and carbon steel. The large, light grey portion is the magnesium. The narrow dark cylinder embedded in one side of the magnesium is the flint rod. The third part of the tool is a separate piece of carbon steel that resembles the blade of a jig saw.

To get a fire started, use the toothed edge of your saw to peel some shavings onto the finest fibers in your tinder nest. Try not to gouge chunks out of the bar. The thinner the shavings are, the easier they are to ignite. Work in an area protected from gusts of wind as these shavings are feather light. If using a knife, utilize the back edge so that you don’t dull the blade of an important tool.

Some instructions recommend creating a dime-sized pile of shavings, but with a well constructed tinder nest, you’ll likely need less. A pile of shavings equal to the size of a pencil eraser may be enough. I recommend that you start with the smaller size and add more shavings if necessary. In this way, you are able to extend the life of your tool.

Hold the magnesium starter in your less dominant hand with the dark flint bar turned upward. Hold the saw blade in your dominant hand, pinching the flat of it between your thumb and forefinger. The narrow edge of the blade will extend just beyond your fingers. Run the short side of the carbon tool across the flint in a downward stroke towards your tinder nest and magnesium shavings. You should immediately see sparks. If they don’t immediately catch, move your hands closer to the magnesium shavings so that there is a better chance of ignition. Hesitate long enough between strikes to check your tinder for a flame.

Another way to coax a spark is to hold the jig blade steady and pull the flint towards your body as you scrape it across the blade, directing the sparks into your tinder bundle. Experiment with both methods to see which is most comfortable and effective for you.
Neither shaving the magnesium nor striking the flint will require you to etch deeply into your tool. If you aren’t having good success and notice that there are deep gouges or an edge that’s worn flat, try a lighter touch.

CAUTION:
Don’t risk holding the tinder nest in your hands when striking a spark with magnesium. It burns so hot that a flaming piece of magnesium could easily burn through human skin all the way to the bone. Instead, allow the magnesium shavings to flare and catch the tinder. THEN you can hold the nest and gently blow, feeding the flame vital oxygen.

Remember, the adrenaline rush of urgent circumstances can decrease fine motor skills, so take the time to get familiar with your fire stick before there is an emergency. Magnesium fire starter sticks can be found at most outdoor retailers for $2 or less. Purchase two of them and practice with one until you are comfortable with it. This small investment of time and money has the potential to save your life.


Here’s a video demonstration of how to start fire using a carbon steel knife with a magnesium fire starter. I don’t recommend gouging at the magnesium in this way, but the process is forgiving and worked for him.

read more “MAGNESIUM FIRE STARTER STICKS”

Saturday, August 28, 2010

HOW TO BUILD A TINDER NEST

Bookmark and Share
Other names for tinder nests are tinder bundles or bird’s nests. Your tinder nest will be used to coax a spark or ember into flame. It maximizes your chances of success in building a fire. Once the nest is burning it is used to start a larger fire.

To construct a tinder nest, select dry and flammable materials. A variety of items can be used from clothes dryer lint, fuzz from socks and sweaters, to foraged materials. Many outdoor enthusiasts carry waterproof containers filled with cotton balls dipped in petroleum jelly for this purpose. Found tinder can include dry grass, cattail fluff, cottonwood down, leaves, thin layers of tree bark, moss, wood shavings, brown leaf litter, dropped pine needles and more. A found bird’s nest will work well also.

Dry tinder will break easily when bent or crushed. If the exterior feels dry, but it gives rather than snaps when bent, the material isn’t truly dry. If the ground is damp, search out materials that are found resting on top of bushes or limbs. These items will be drier than ground litter because they have been exposed to the sun and air.

Place damp tinder inside your jacket, but not next to your skin. By the time you are ready to start a fire later in the day, the tinder will have been dried somewhat by your body heat.

Shredding the tinder creates additional surface area that will more easily catch flame. Materials that are fuzzy are ideal for feeding a spark. Gather the tinder on a bandanna or other cloth. Grab a length of tinder in both hands and move your fists in a bicycle pedaling motion. Work over the entire length of the tinder. The tinder will soften and become pliable. Bits and fine dust will fall down from your hands and be caught on the bandana.

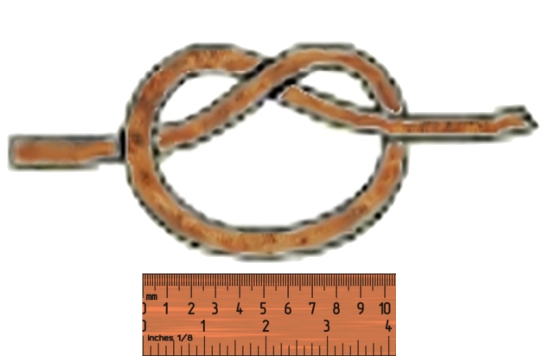
Take some of the coarse pieces of prepared tinder and create a loose over hand knot with a diameter of about four inches.

Stuff the remaining tinder into the knot’s loop. Keep stuffing the nest until it is dense. It must be able to prevent the coal from falling through the fibers and out of the nest and it must provide enough fodder to keep the spark from fizzling out before a flame starts.

Collect the dust that has fallen into your bandanna and place it in the center of the nest. It will help if you first make a small hollow or depression in the center of the nest to contain the dust. As you pick up the dust you will notice that the finest particles fall back down onto the bandanna. This will mean that you'll be packing finer and finer dust into the nest’s depression until the finest dust will be on the top, just where you'll place the spark or ember.

Once your nest is assembled, keep it in a protected area where it won’t be bumped or blown around by the wind. Then assemble the fuel for your fire and prepare to strike a spark.
read more “HOW TO BUILD A TINDER NEST”

Kay is . . .

a perpetual student of things I find interesting and (I hope) helpful to others. Feel free to use and apply all information with a healthy dose of common sense. :-)


Search By Category


References & FUN

CLICK THE COUPON 2 VISIT iHERB

iHerbButton

ADD KAY 2 UR LIST!

No Greater Joy!

NGJbutton